|
Tomatovillian
Join Date: Jan 2018
Location: Philly 7A
Posts: 739
|
 Raised Bed Back Hill #2
Raised Bed Back Hill #2
March 3rd, 2016
(I always buy my lumber from Lowes...much better selection)
Earlier in the week I picked up some 2x10's, 2x4's and hardware for the raised bed and dug out around the old raised bed, I got home late and only had about a half an hour of light so I didn't get much done. Doing a bit of digging I was actually pretty impressed with the soil.
Since the weather forecast is for snow until Saturday sometime, I left work an hour earlier today to try and knock out this Raised bed, I figured the extra hour would be just enough time to knock out one of the raised beds. The weather complied, it wasn't too cold if I kept moving.
- I dug out the area a bit more and removed the wood, These raised beds were built in 1999, you can see how weathered the wood is that's behind the shovel. What happens is, it rots out where the screws are but the wood is usually still in fairly good shape, if left undisturbed. Anyhow I figured this is my last time doing this... they're gonna bury me in this bed... so I opted for additional hardware. The wood was all cut and placed on the hill.
- Corner braces are put in, This will be the bottom. Then two 3" screws secure the other end, which will be the top.
- The bed is flipped and four 8-1/4" long 2x4's are cut but not secured yet, all the lengths of 2x4 for the cap are cut and secured to the top, using the 2x4x8-1/4" supports as a guide for a 1-1/2" overhang. After all the 2x4 (caps ) are screwed in place I installed the 2x4x8-1/4" supports, this will allow the bed to rest on the retaining wall cap stones and the bed will sit 1" below the cap stones.
- Then the reinforcing "L" angles are installed, butting up against the 2x4 cap. I made one small error that added 3" to the width of the bed, when I measured the side pieces from the old bed, I didn't realize that they were attached to the sides of the longer piece, so when I built this one I put the sides on the inside, adding 3", it's not a deal but it's a tad tighter than I wanted it to be when walking behind the bed with the tree there.
- I am glad I knocked this out yesterday, its gonna be a mess with all the snow we have coming.
It's not done yet, there's a few more tweaks that this bed will get, I am working on copper corners that I will cut from 3" pipe, anneal and peen , then the cap will be trimmed with Copper tape to keep slugs out and finally it will be stained in the fall after it has weathered a bit.
March 5th-6th, 2016 - This weekend was nice, and when I say nice I'm referring to it being dry not necessarily warm. I decided to tackle the other raised bed since the other came out so well. I knew this was going to be a nightmare, I have amassed so much stuff in this corner that it took on a life of it's own, so I just decided to jump right in.
This is where I stored all my Pit wood, along with some pool supplies, river rock, extra pavers, extra cap stones from the retaining wall, bricks, extra lumber from the Koi Pond build, Tarps, pond supplies and a whole bunch of other $hit I don't need.
- All the wood is moved to the playhouse for now, all the pavers are sorted and will be re-stacked once the bed is finished. The pond and pool supplies are trashed, most of the "JUNK" lumber is burnt, I did reserve some lumber to see if I need any for this years gardens but will most likely burn it after the gardens are up and running.
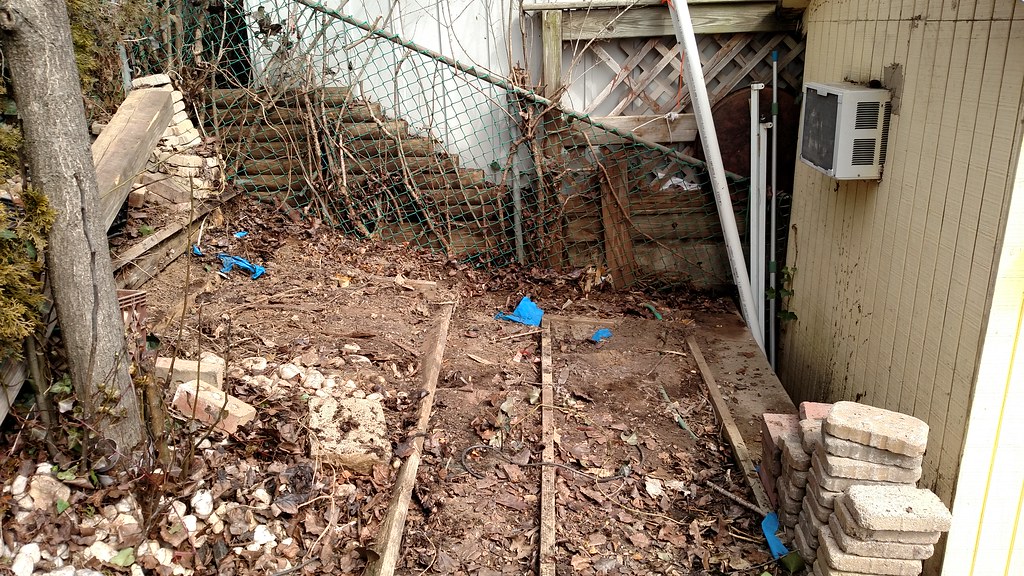
- The old raised beds are torn up and burnt in the pit. A water barrel is put in place and will need to be painted. I'm not sure if I will use this, but I may put in some wicking pots someday, not sure yet. I will still need this area for storing my fire wood, garden supplies, tarps and pavers but will have to tighten it up a bit.This area is leveled for the compost bin.
- I found an old water line that I may use for irrigation, its a hose that runs from the house, underground and up under the retaining wall, hopefully it still works. That was put in twenty + years ago...at least!
- The hardest part about building these beds has been removing the River Rock and the cleanup, this is the 3rd time they have been moved, every single one has been picked up three times, first to go into my front yard, then some were removed and replaced to build the pond-less waterfall, then they were all moved to the back yard when I built the Koi Pond, now they are being moved again into buckets and crates, I need to find a home for these stupid rocks.
|