Discussion forum for the various methods and structures used for getting an early start on your growing season, extending it for several weeks or even year 'round.
|
 |
|
|
Thread Tools | Display Modes |
 August 20, 2011
|
#1 |
|
Tomatovillian

Join Date: Aug 2011
Location: northern NJ zone 6b
Posts: 1,862
|
I've been searching but all I seem to find are posts about greenhouses to extend harvest. What about just keeping those tomato plants going another month or two outdoors...is there anything anyone has used...outdoors, over a full mature tomato plant (or 3 or 4) that has allowed them to extend the harvest long enough to get all of their tomatoes ripened? Covers of any kind? I'm talking about 5' tall plants.
If you pull up tomato plants and bring them indoors, doesn't it shock the plant? Just dig them up and put into pots or 5 gallon buckets? Any and all suggestions are welcome! I do have a screened in porch with glass but very little of it gets southern exposure and there's a lot of tree cover. Not sure it would work as a "greenhouse" of any kind, so I'm looking for any suggestions or tips that anyone else has used. thanks! |

|

|
|
August 20, 2011
|
#2 |
|
Tomatovillian
Join Date: Jan 2010
Location: NW Indiana
Posts: 1,150
|
I use one of these to create Quick Tunnels: http://www.johnnyseeds.com/p-7708-qu...er-4-diam.aspx - though I've never tried it on large tomato plants. If you can fit your plant in the tunnel, there's no reason it won't work. Mind you, it won't protect against a really hard freeze, but it will keep frost off the plants on those crisp fall evenings. They are best used for cool weather veggies. Serving fresh salad on Thanksgiving, with garden carrots and radishes really impresses the in-laws.
 I don't think that digging up a plant and bringing it inside will be very rewarding. I would think that the transplant shock will be a major setback. And don't forget, you're not just racing against the first frost date, you're also facing dwindling daylight hours. |
|
|
|
|
August 20, 2011
|
#3 |
|
Tomatovillian
Join Date: Aug 2011
Location: northern NJ zone 6b
Posts: 1,862
|
oh that is very cool. I think I need one of those lol.... I'm planning an indoor tomato project this winter for fun, but I really want to get the harvest off my existing plants. They are tall, about 5' but maybe I can make that work. Would also need the coverings too, but yes, it would be temporary, and just to extend to about Thanksgiving or so.
Sure, if I had my druthers, I'd have a heated conservatory attached to my house, but that isn't happening any time soon so I'll just have to work with what i have. Thanks so much for the suggestion! |
|
|
|
|
September 11, 2011
|
#4 |
|
Tomatovillian
Join Date: Apr 2010
Location: 2 miles south of Yoknapatawpha Zone 7b
Posts: 662
|
I'm trying this for the fall and maybe the spring as well.
If you're interested, let me know and I'll provide the details. Claud |
|
|
|
|
September 19, 2011
|
#5 |
|
Tomatovillian
Join Date: Aug 2011
Location: northern NJ zone 6b
Posts: 1,862
|
Well, I only have two pineapples left, and a massive san marzano that won't quit, but I like that hoop tunnel...care to share information? It might work for next year.....
|
|
|
|
|
September 20, 2011
|
#6 |
|
Tomatovillian
Join Date: Jan 2009
Location: Calgary, AB Canada (Zone 3A)
Posts: 443
|
I'm in zone 3a and I usually keep my a few of my tomatoes going until close to mid october. I just cover them with old bed sheets at night and sometimes clear poly if I run out of sheets. The bedsheets work best for me though, as they drape over any size plant easily and seem to hold in place better as I am in a windy area of the city. Not fancy, but keeps the frost off them.
|
|
|
|
|
September 22, 2011
|
#7 |
|
Tomatovillian

Join Date: Jan 2006
Location: Northern Minnesota - zone 3
Posts: 3,220
|
Claud, please do provide more details of your hoop structure.
 I assume the flexible pipe is inserted onto rebar pounded into the ground? I have a similar lower structure over my early spring lettuce beds. Also, I'd love to see more pictures of your greenhouse that appears in the back of the photo. I like your window venting, had seen something like that in a local nursery that is no longer operating, and the greenhouse is gone, so I can't go to investigate. I assume the flexible pipe is inserted onto rebar pounded into the ground? I have a similar lower structure over my early spring lettuce beds. Also, I'd love to see more pictures of your greenhouse that appears in the back of the photo. I like your window venting, had seen something like that in a local nursery that is no longer operating, and the greenhouse is gone, so I can't go to investigate.
__________________
Dee ************** |
|
|
|
|
September 22, 2011
|
#8 |
|
Tomatovillian
Join Date: Apr 2010
Location: 2 miles south of Yoknapatawpha Zone 7b
Posts: 662
|
I'll post the details on the trellis and window as soon as time allows. Claud
|
|
|
|
|
September 23, 2011
|
#9 |
|
Tomatovillian
Join Date: Apr 2010
Location: 2 miles south of Yoknapatawpha Zone 7b
Posts: 662
|
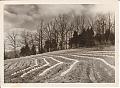
I've always liked to try different things. Some work out, some don't. The photo in my avatar was taken in 1961. It's early tomatoes covered with a product called "Hot Caps" and planted on a south facing hillside. They worked and let us start selling tomatoes about 3 weeks earlier than normal while the prices were still at a premium, but we only used them one year which should tell you something. Anyone making a living from truck farming has my sympathy. We staked our tomatoes using oak stakes from the local saw mill sharpened on the end using a hachet. I would say it was fun standing on a five gallon bucket in loose sloping soil with a 5 pound shop hammer driving tomato stakes, but it wasn't. Acres of tomato stakes. Every year. I dislike tomato stakes. But that's just me, feel free to stake your tomatoes any way you choose, or just let them lay there on the ground.
If you want to ruin someone for life, take them to a tomato patch, pull a nice ripe tomato off the vine, wipe it on your pants leg, have them lick it, sprinkle a little salt on it and let them bite into it. Ruined for life. Pruning and tying tomatoes until your hands are green from handling the vines, wet with sweat from head to toe and you pull the salt shaker from you pocket, eat a nice big juicey one and go right on. They won't tie themselves. Which brings us to the tomato trellis. I wanted a way to support my tomatoes without bringing back those childhood memories. I also wanted something fairly cheap, strong, easy to modify, and would last for years. I've been using this trellis system for three years and I'm happy with it. The cost can be spread out if you're on a shoestring and doesn't require a lot of tools or skill. I use high beds in the garden. They are four feet wide and forty feet long, but you can make the trellis fit what you have. It uses materials available from any building supply. What you'll need: 1" x 10' thinwall metal conduit. (this is cut into 1' pieces with one end hammered closed and used as an anchor for each post. We have strong winds here and these hold the trellis in place nicely without any problems. Each piece will make 10 anchors and cost about $10.00.) 1" x 10' pvc plastic conduit. (this is cut into a 7' piece used for a post and a 3' piece used at the top of the trellis. A bell connector is molded into one end of the conduit and should be on the 3' piece allowing them to connect if necessary. The pvc conduit should say UV stable so it doesn't degrade in sunlight. Mine has been in the sun for 3 years with no signs of degrading. Each piece makes 1 post and 1 3' top piece and cost about $2.42. 1/2" x 10' thinwall metal conduit. (this is used to tie the tops to the posts and hold the frame sections in place. It also support the plants if your are using tomato clips. Cost about $2.05) 1/2" thinwall coupling. (used to fasten the 1/2" metal conduit together for trellises longer than 10'. Cost about $0.45 each.) 1/2" x 10' pvc plastic conduit. used for the hoops on top of the trellis and to brace the trellis and fasten the plastic cover in place. cost about $1.21 each. 8" black UV stable cable ties. (used to fasten it all together. Makes for easy assembly and disassembly. Cost about 19.95 for a bag of 1000. 3/4 x 3/4 x 4" pieces of wood. (These are screwed to the top pieces and slip into the top of the posts to fasten them together. Most people can make these from scrap lumber. If you can't, become friends with someone who can or buy 7/8" x 36" dowel rod. Cost free or about $1.50 for the dowel) #8 x 3" drywall screws (used to fasten the 4" sticks to the top pieces. Cost about $3.50 per pound or .20 each.) 3 to 6 mil clear plastic (used to cover the trellis, hopefully just before freezing weather. The thicker the plastic the longer it will last. Since this is a trial I plan to use a cheap 3 mil which should last through this season. Size will depend on how big your trellis is. To cover my 4' W x 20' L X 8' H trellis with 3 mil will cost about $20.00.) My 4' W x 20' L x 7' H trellis used: 12 anchors $ 12.00 12 posts 20.30 12 3' top pieces 8.70 4 1/2 inch thinwall 8.20 2 1/2" tw couplings .90 4 1/2" x 10' pvc conduit 4.84 12 #8 x 3" drywall screws 1.60 76 8" cable ties 1.52 total 58.06 or about $3.00 per foot of row. Putting it together: 1. Cut the 1" x 10' pvc conduit into 7' and 3' pieces. 2. Cut the 1 1/4" thinwall conduit into 1' pieces and debur the ends. Close one end. 3. Use a board to avoid damaging the ends (as shown in the first picture) and install them on both sides of the row on 4' centers. After you install the first anchors on the end of the row use one of the posts marked at 4' and another mark for the row width to use as a guide to place the remaining anchors. Insert posts into the anchors as shown in the second picture and use a level to plumb the posts by tapping the anchors at the ground. 4. If your row is wider than 3' join two of the 1" x 3' pvc conduit together. Don't glue the joint, just tap one end with a hammer to seat the connection. Measure the row width and fasten the 3/4 x 3/4 x 4" boards to the top piece as shown in the third picture. 5. Attach the top pieces to the top of the post by inserting the boards into the top of the post. 6. Attach the 1/2" metal conduit to the top of each trellis section with cable ties. Leave the tie loose for now. After you have the conduit hanging in the proper position, start at one end and plumb each post and tighten the cable tie. After all segments are plumb and tight back off and see if everything looks ok. If not, adjust the connections accordingly. Next install additional ties to tie the 1/2" conduit to each post. Refer to the fourth picture. The bed can be prepared for the next crop with the trellis in place. Picture 5. Hoops can be added. Picture 6. Top of trellis conduit was trimmed to allow plastic to be installed when the time comes. Picture 9. Now lets eat some tomatoes. Claud cold frame anchor.jpg Anchor detail.jpg Top support detail.jpgTomatoes May 22 2011.jpg Preparing the bed with frame in place.jpg Update 10/3/2011: We had our first cool weather this past weekend, so I covered the frame with plastic to see how it was going to do. I bought a 4 mil 20 foot x 32 foot piece from a local building supply for $14.00 and made clips from 4 inch lengths of 3/4 inch and 1 1/4 inch pvc conduit. The temp got down to 41 degrees Saturday night. At 10:30 am the temp outside was 65 degrees and inside the cold frame it was 100 degrees, so I rolled the covers up. Looks like it's going to work fine if I don't forget to open the vents and roast the plants. Last edited by saltmarsh; October 3, 2011 at 08:12 PM. |
|
|
|
|
September 23, 2011
|
#10 |
|
Tomatovillian
Join Date: Jan 2006
Location: Northern Minnesota - zone 3
Posts: 3,220
|
This is really helpful information! Thanks, Claud! I could have used it last year when we had such a cloudy cool summer and l was wishing I had a way to easily cover my existing tall plants by August.
Another question, how do you plan to keep the long sides of the plastic anchored? On my 8' or 12' lettuce beds that I grow in the spring and fall, I have the plastic between a 1x4 nailed to a 2x4 on each side. (click on thumbnails) 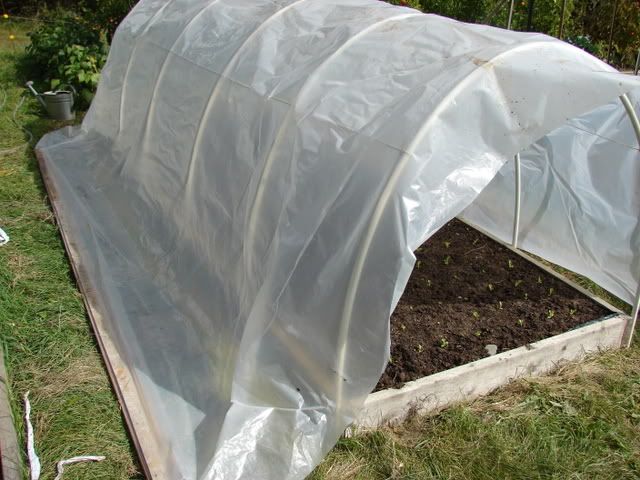 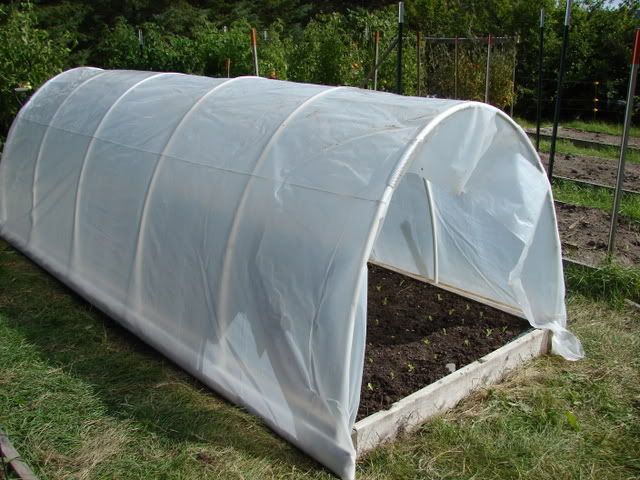 This works great for adjustable ventilation because I can roll up one or both sides and set them up on cat litter buckets filled with water (for weight). Also, pushing the water buckets up against the frame anchors the plastic from blowing up in wind. My beds are not very high, I can easily toss one side board over the top to open it completely. For taller beds like yours, my removal method wouldn't work without help. What is the center height of your arches? 
__________________
Dee ************** |
|
|
|
|
September 23, 2011
|
#11 |
|
Tomatovillian

Join Date: Dec 2007
Location: north central B.C.
Posts: 2,310
|
Dee, I have used similar hoop covers. A cheap way to attach the plastic is to take short (1") lengths of the hoop material and split it lengthways, making a clip, or similar clips can be bought. I find that bits of old water hose works very well, it is a bit softer and easier to maneuver and is a bit kinder to the plastic.
|
|
|
|
|
September 23, 2011
|
#12 |
|
Tomatovillian
Join Date: Jan 2006
Location: Northern Minnesota - zone 3
Posts: 3,220
|
Salix, one problem in my front garden site is wind, I have full exposure to those strong cold northeast and east winds. If I don't have the plastic strongly secured along the base, it balloons with each wind gust and eventually works it's way loose. Thanks for the hint on using old hose, I've got several leaky old ones I can cut up.
I do use clips to attach the plastic to the end hoops. I don't have much for tools, and couldn't find anything to easily split the pvc pipe, so I ended up buying a length of some clear flexible kitchen plumbing hose and cutting that to make the clips.
__________________
Dee ************** |
|
|
|
|
September 23, 2011
|
#13 |
|
Tomatovillian
Join Date: Dec 2007
Location: north central B.C.
Posts: 2,310
|
Another quick trick - for the more temporary shelters, instead of fastening the edges of the plastic or row cover to a board, a length of rebar is sufficiently heavy to hold it down. I usually have some of that in the garden anyway for staking or support of some type. Actually, I use 2' lengths pounded into the ground as anchors for the pvc hoops, so any extra lengths will be used to hold down the edges instead of mounding up dirt. I do have a large number of fabric pins and netting stakes which work well, but a length of rebar works just as well and doesn't put holes in the covering.
|
|
|
|
|
| Thread Tools | |
| Display Modes | |
|
|


 View Public Profile
 Find More Posts by lakelady

 Linear Mode

