General discussion regarding the techniques and methods used to successfully grow tomato plants in containers.
|
 |
|
|
Thread Tools | Display Modes |
 May 4, 2009
|
#1 |
|
Tomatovillian

Join Date: Apr 2009
Location: Illinois
Posts: 180
|
Let me start off by saying that this is my first post
 and that I am really enjoying this site and the wealth of knowledge here. and that I am really enjoying this site and the wealth of knowledge here. I'm planning to build a SWC (sort of EarthTainer style) out of wood. I've been trying to figure out what to line the inside with to make it hold water and be safe for plants/food. Firestone makes an EDPM pond liner product called Pondgard. It is advertised as fish safe. Any idea if it would be safe for growing tomatoes? Any better ideas? Thanks |

|

|
|
May 5, 2009
|
#2 |
|
Tomatovillian

Join Date: Feb 2006
Location: Germany 49°26"N 07°36"E
Posts: 5,041
|
Chucker, welcome to TVille and enjoy your stay. A lot of knowledgeable folks here and all you have to do is ask the question. EDPM should work fine for a liner. I grow most of my maters in containers but not in closed systems like earthTainer or growboxes. We have Ray here who designed and developed the earthtainer and is always happy to assist.
You can also purchase growbags which are very inexpensive and normally good for one season. EDPM should last several seasons. Just depends on what you want to do. Smart Pots are new and I'm trying a 10 gal size this year to see how tomatoes grow in them. They are pricey but we will see. Heres a link to a site that sells growbags and Smart Pots. Ami http://www.hhydro.com/cgi-bin/hhydro/HYDROPONICS_PARTS.html?pg=Hydroponics%20Parts
__________________
Life's journey is not to arrive at the grave safely in a well preserved body, but rather to skid in sideways, totally worn out, shouting ...Holy Crap .....What a ride!' |
|
|
|
|
May 5, 2009
|
#3 |
|
Tomatovillian
Join Date: Apr 2009
Location: Illinois
Posts: 180
|
Thanks for the reply Ami. I was drawn to Ray's EarthTainer design because I love the engineering and experimenting that goes with it, although the Smart Pots do look interesting. I plan to follow Ray's plans as close as I can, but I'm sure that building with wood will throw a few changes my way. I'm glad to hear that EDPM is a safe to use in a container.
|
|
|
|
|
May 6, 2009
|
#4 |
|
Tomatovillian

Join Date: Jan 2008
Location: Austin, TX Zone 8b
Posts: 531
|
Build the frame with 2x4's and line the inside frame with plywood.
How tall, wide and length. |
|
|
|
|
May 6, 2009
|
#5 | |
|
Tomatovillian
Join Date: Apr 2009
Location: Illinois
Posts: 180
|
Quote:
|
|
|
|
|
|
May 7, 2009
|
#6 |
|
Tomatovillian

Join Date: Jul 2008
Location: 6a - NE Tennessee
Posts: 4,538
|
Chucker, my curious brain is wondering how you will set up the "wicking stem". My love of and skills in woodworking also have given this type of planter a lot of thought - mostly because I have an abundance of wood and some large 3/32" plastic sheets. I've even thougt of a long permanent fixture that would have "cells" for each plant.
So, how are you solving the WICKING feature? Ted
__________________
Ted ________________________ Owner & Sole Operator Of The Muddy Bucket Farm and Tomato Ranch |
|
|
|
|
May 7, 2009
|
#7 |
|
Tomatovillian

Join Date: Mar 2008
Location: SW Ohio
Posts: 1,818
|
Have you thought about building a wood box to hold the Rubbermaid container? Sort of like a wooden cover?
__________________
Barbee |
|
|
|
|
May 7, 2009
|
#8 |
|
Tomatovillian
Join Date: Jul 2008
Location: 6a - NE Tennessee
Posts: 4,538
|
Barbee, I kind of passed that idea by as being somewhat "redundant". But, I can see how that "could" work for some folks. It would eliminate the need for the side-supports that control bulging.
The EDPM liners are very flexible, almost soft, and I'm wondering how Chucker will prevent/reduce the soil in the wicking assembly from being eroded into the water reservoir. Also, what cleanup at the end of the season entails. Ted
__________________
Ted ________________________ Owner & Sole Operator Of The Muddy Bucket Farm and Tomato Ranch |
|
|
|
|
May 7, 2009
|
#9 |
|
Tomatovillian
Join Date: Mar 2008
Location: SW Ohio
Posts: 1,818
|
Yeah, probably redundant, but I was thinking along the lines of cleaning them out at the end of the season. Just pop out the 'tainer and clean it. And you wouldn't have to worry about leaching.
Plus you could attach a really cute wooden trellis to it  I'm all for the cuteness LoL
__________________
Barbee |
|
|
|
|
May 7, 2009
|
#10 |
|
Tomatovillian
Join Date: Apr 2009
Location: Illinois
Posts: 180
|
Ted -
My plan at this point is to construct an open top wood box out of plywood. Then, I plan to line the inside of the entire box with the pond liner. I'll probably have to add a small shelf system to hold the inside floor. I was thinking of surrounding the inside perimeter with 1x2s or 2x2s about 5" from the bottom. I know the wood will rot, but I can replace it every year or two. This is the weakest part of my plan. On top of the perimeter shelf, I plan to use eggcrate (from fluorescent light fixtures) wrapped with nylon window screen (to keep the soil potting mix from falling through - I saw this on another site) and attaching a small PondLife basket underneath - similar to EarthTainer plans. I will cut a hole in the middle of the eggcrate for the potting mix in the pondlife basket to wick into the upper part. I'll probably drill a hole or two through the wood that I use to support the eggcrate through to the outside to allow water to overflow. I am undecided as to whether or not I will line the potting mix area with landscape fabric. There seems to be a debate on this, and I'm not sure if I'll add it or not. And then, the main reason for the wood is to make it look nice, I plan to add some amount of trim to the outside to make it resemble a nice planter box - and probably paint it to match my shed. Not sure if all that makes sense, but that's what is in my head .I will probably try all of this this weekend, so if you have any better ideas, let me know. |
|
|
|
|
May 8, 2009
|
#11 |
|
Tomatovillian
Join Date: Feb 2006
Location: Germany 49°26"N 07°36"E
Posts: 5,041
|
Chucker, excellent idea on the eggcrate! The first time I read about eggcrate was it's use in saltwater aquariums used to make a plenum at the bottom of the tank. And basically that is what is being created in the Tainers when the insert or shelf is inserted in the bottom of the tainer. If you work it right you shouldnt need a pond basket either. Cut a section out of the eggcrate to the dimensions of the desired wicking area and just push your nylon screen down into it to form your wicking chamber. Make sure you nylon screen covers the entire area of the inside of the tainer and drapes over the top of the container. That way at the end of the growing season you can pull the plant and aggregate out of the Tainer by the screen in one easy operation. Ami
__________________
Life's journey is not to arrive at the grave safely in a well preserved body, but rather to skid in sideways, totally worn out, shouting ...Holy Crap .....What a ride!' |
|
|
|
|
May 8, 2009
|
#12 |
|
Tomatovillian
Join Date: Jul 2008
Location: 6a - NE Tennessee
Posts: 4,538
|
I might replace the basket with a piece of 3" or 4" PVC drain pipe with several 1/4" or 3/8" holes drilled. This will allow you to use just about anything to fill the wicking column (PVC Pipe). Some ideas that had hit me were: old pantyhose, old athletic sock, ANY kind of fabric, sponges, and those pellets that expand when wet. With this (whatever) full of mix (and packed in), you don't get the water reservoir full of growing mix. The sock/stocking/etc acts as a filter of sorts. You can even put this over the outside (waterside) of the pipe and hold it in place with a couple of zip ties. This will give you a more linear column of wicking material (mix).
Also, use of the PVC pipe would allow you to easily adjust the depth of the water reservoir to the depth you want it. Otherwise, the basket size would be driving this dimension. Another idea that floated thru my overactive mind was to build the decorative cosmetic outside as separately as possible, only "attaching" it to the planting assembly. That way, you can replace the "insides" and keep the outside look without a total rebuild. If you do any caulking of any seams, use the type that seals gutters as it is meant to be under water after it cures. Regular caulk for windows and doors will not last under constant flooding conditions. The water-input pipe/hole and the hole you cut to allow overflow of the water reservoir should have some screen material over them to prevent mosquitoes from using the reservior as a hatchery. One last thing, the size of your final assembly will drive the need to have it be level. The wider you make this thing, the more critical the leveling and the more tendency the wood will have to sag under the weight (remember, they get wood wet to bend it). I had even thought about putting a couple of bubble levels on the edges for both axis. Hope some of these comments will help you make good decisions on your design. Well, I've talked myself into building one of these things.  Dang, another project. Dang, another project.  Ted
__________________
Ted ________________________ Owner & Sole Operator Of The Muddy Bucket Farm and Tomato Ranch |
|
|
|
|
May 8, 2009
|
#13 |
|
Tomatovillian
Join Date: Apr 2009
Location: Illinois
Posts: 180
|
Great ideas. I already have the PondLife Basket, so I am going to use that for at least the first one, however I like the sock/stocking idea and Ami's screen idea. Now I've got too much to think about
 . .I think I will add screen to the outside holes to keep the mosquitoes out. I hadn't thought of that before. I need to figure out a way to make the mosquitoe screens removable - maybe attach them to the outside somehow? I'll try to take pictures as I build - I need to make two of these for the plants I have - I'm sure I will learn something from the first one I try to build. Be cool if you start building one too, so we can compare lessons learned. Last edited by Chucker; May 8, 2009 at 09:32 PM. |
|
|
|
|
May 9, 2009
|
#14 |
|
Tomatovillian
Join Date: Apr 2009
Location: Illinois
Posts: 180
|
First day progress:
I built the main box out of 1/2 inch plywood and joined sides with box joints: 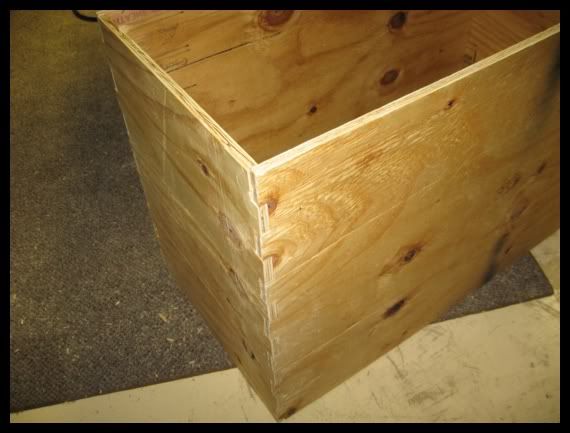 The I added some 2x2s at the bottom. These will hold the plywood floor up off the ground - should potentially help the bottom not rot as fast: 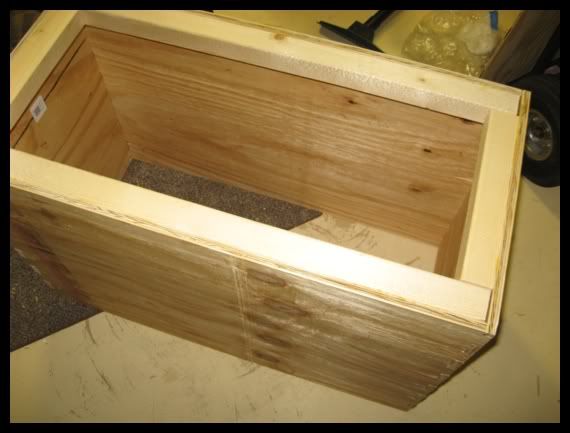 Then, I went a little out of planned order, and tested out my trim ideas on the front of the box. I had some ideas in my head and wanted to see how they looked before I bought too much wood. This order of construction should work out ok anyway because I'd like to wait until the end to add the items that may need to be replaced in the future (should make them easier to remove): 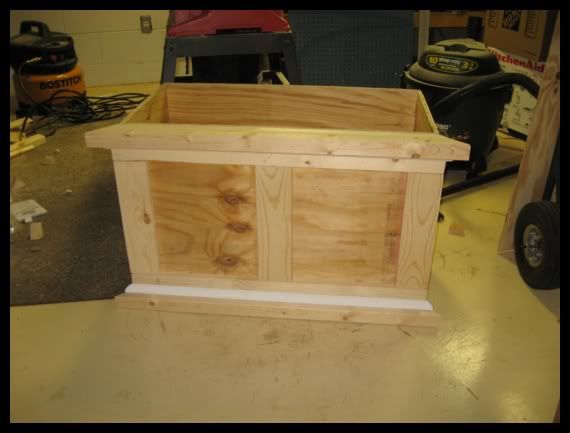 I'd like to finish construction on this one tomorrow and maybe get some primer on it (not likely, but possible ).
Last edited by Chucker; May 9, 2009 at 11:13 PM. |
|
|
|
|
May 9, 2009
|
#15 |
|
Tomatovillian
Join Date: Mar 2008
Location: texas
Posts: 1,451
|
That is looking great Chucker! Not being a woodworker anything I add would probably sound dumb
 I am practically skilless at this kind of thing. Something I would look at is adding either a 2X2 center brace in the bottom or 2 smaller ones across because once again sagging. With all the water weight and weight of soil you would have alot of weight on the bottom plywood and now it is off the ground a few inches. I would expect some sagging in the middle. My husband built me some 18 and 10 gallon tainers and they are very heavy. Have you thought about putting casters on the bottom to help with moving them? I am practically skilless at this kind of thing. Something I would look at is adding either a 2X2 center brace in the bottom or 2 smaller ones across because once again sagging. With all the water weight and weight of soil you would have alot of weight on the bottom plywood and now it is off the ground a few inches. I would expect some sagging in the middle. My husband built me some 18 and 10 gallon tainers and they are very heavy. Have you thought about putting casters on the bottom to help with moving them?Kat |
|
|
|
|
|
|


 View Public Profile
 Visit Chucker's homepage!
 Find More Posts by Chucker
 Linear Mode

