General discussion regarding the techniques and methods used to successfully grow tomato plants in containers.
|
 |
|
|
Thread Tools | Display Modes |
 August 19, 2015
|
#1 |
|
Tomatovillian
Join Date: Jul 2015
Location: Lincoln, NE
Posts: 192
|
ordered an earthbox last week, thought it would make for a perfect planter box to set in front of South window this winter...
All you carpenters out there, go easy on me; my miter cuts are terrible. It's definitely got that "10 foot look". LOL I put a 2nd 3/4" snorkel in it that has a wine cork in it, attached to a wooden dowel. I made marks on the dowel for full-empty so we dont' overfill. I didn't build the planter with the overfill in mind. I wish the overfill would have been a single hole I could have plugged, not the 3" wide overfill slot. Oh well. I have Red Robin tom. and purple Jalapeno seedlings that are ready for transplant. Im going to fill with ProMix Organic, a few cups of 8-8-8 fertilizer, then put plastic cover on the earthbox and top the cover with hydroponic growstones...just for aesthetics.  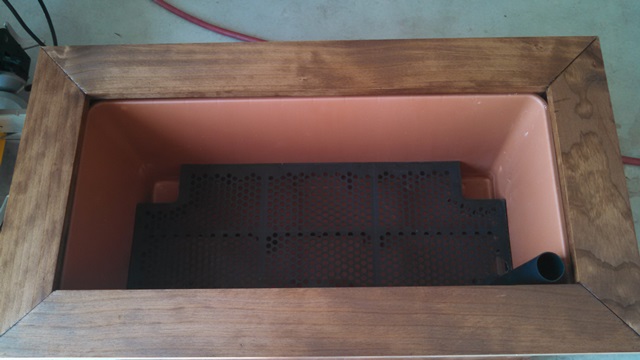
Last edited by pecker88; August 19, 2015 at 09:31 PM. |

|

|
|
August 19, 2015
|
#2 |
|
Tomatovillian

Join Date: Apr 2007
Location: Campbell, CA
Posts: 4,064
|
Your woodworking skills look excellent!
 If the EarthBox is setting on a sub rim within your outer box, you can fashion a cage system using the Gurney's Pea Fence:  You simply need to bend a 1/2" portion inward to insert underneath the EarthBox as above.  The weight of the loaded EarthBox locks the "feet" in place.  Also, rather than using the ugly showercap, I use a piece of black plastic trash bag cut so that it fits around the plants, then cover it with orchid bark. Raybo 
|
|
|
|
|
August 20, 2015
|
#3 |
|
Tomatovillian
Join Date: Apr 2007
Location: Campbell, CA
Posts: 4,064
|
I would also put a cork in the EarthBox overflow hole, as you do not want any water leaking on the inside of your wooden enclosure and onto your floor.
 Raybo 
|
|
|
|
|
August 20, 2015
|
#4 | |
|
Tomatovillian
Join Date: Jul 2015
Location: Lincoln, NE
Posts: 192
|
Quote:
|
|
|
|
|
|
August 20, 2015
|
#5 |
|
Tomatovillian
Join Date: Nov 2011
Location: Long Island NY
Posts: 1,992
|
To echo Raybo, your build looks great!
Personally I would not plug the overflow gap as that is also allowing air to enter on the bottom side. If you feel you must plug it, cut a piece of plastic slight larger than the gap and use some tub and tile caulk to seal it shut. |
|
|
|
|
November 7, 2015
|
#6 |
|
Tomatovillian
Join Date: Jul 2010
Location: Jupiter, FL (10b)
Posts: 97
|
Not sure how I missed this thread. That box looks great! How are things working out with it??
|
|
|
|
|
November 7, 2015
|
#7 |
|
Tomatovillian
Join Date: Mar 2015
Location: New York
Posts: 156
|
Very nice indeed.
|
|
|
|
|
November 7, 2015
|
#8 |
|
Tomatovillian
Join Date: Jul 2015
Location: Lincoln, NE
Posts: 192
|
thanks for the props. Its worked out better then expected. Take a look at the 4 month old purple Jalapeno.
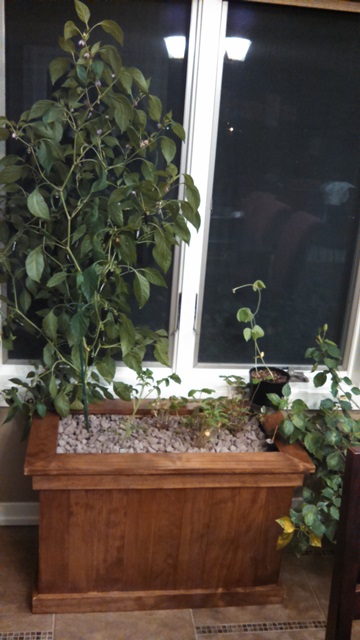 The small plants on the right are alpine strawberries (no runners) that are doing OK, not great. When they came in the mail they were loaded with spider mites. Our 4 yr old daughter never lets the berries get very big and they "disappear"; little stinker. I also planted a red robin earlier that produced about 12 nice cherry toms. After it was done, I replaced with a better bush, its only a few wks old. Last edited by pecker88; November 7, 2015 at 11:32 PM. |
|
|
|
|
November 8, 2015
|
#9 |
|
Tomatovillian
Join Date: Jul 2010
Location: Jupiter, FL (10b)
Posts: 97
|
That setup looks really nice inside. How do you like the purple jalapeño? I'm thinking I'll do some hot peppers next summer - I used to grow them a lot but haven't since moving to Florida.
Funny about the daughter and the berries. She knows good eating. |
|
|
|
|
November 8, 2015
|
#10 |
|
Tomatovillian
Join Date: Jul 2015
Location: Lincoln, NE
Posts: 192
|
I'm starting to think the purple Jal. is more ornamental then edible.
It's extremely easy to grow, each of the 3 plants I have in various setups/media are huge and look very nice. The purple flowers and black pods also look unique/pretty. But, we had a big gathering today and I picked 20 or so pods, sliced them and sauteed in oil to put on bbq pork/beef sandwiches. The pods contain a clear skin that starts to separate when cooked. The skin is tough and difficult to eat. Not to mention the loads of seeds in the smalish-pods. Last complaint, the pods have absolutely no heat; mine are like eating bell peppers. Maybe I'm not letting them mature, not sure but I've so far been UN-impressed. |
|
|
|
|
|
|


 View Public Profile
 Find More Posts by pecker88
 Linear Mode

