General information and discussion about cultivating all other edible garden plants.
|
 |
|
|
Thread Tools | Display Modes |
 April 23, 2016
|
#1 |
|
Tomatovillian
Join Date: Jan 2008
Location: Ozark, Mo.
Posts: 201
|
Last spring or early summer, friends of our daughter gave her a bundle of garlic starts. These folks live on a farm and they said this good strain of garlic has been raised by their family there for over 100 years. They also said it spreads in the garden and into flower beds, so they have to pull it back sometimes - hence the young plants to give away.
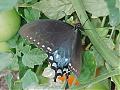
I planted the starts in a corner of my vegetable garden but they didn't do well last year. I'm pretty sure garlic should be transplanted in the fall, not spring - so these pretty much just went away over the course of last summer and I thought I'd lost them. Much to my surprise, they've come up real nice in that corner this spring (picture). When I saw what was going on, I gave them some liquid fertilizer and they're doing well. Tell me about growing garlic, please - I've never grown it before. My wife uses a lot of garlic in her cooking and I'd like to keep this patch going permanently and get some good use out of it. I have no idea what kind of garlic this is (hard neck, soft neck, etc.) or how to handle it from here. Thanks for any info! 
|

|

|
|
April 23, 2016
|
#2 |
|
Tomatovillian
Join Date: Jun 2015
Location: 6a
Posts: 322
|
Garlic is planted in the fall to encourage the monobulb to split and grow into a multiclove bulb of garlic by spring. Some people plant in the spring, and I've heard it only grows into a giant monobulb. I'm guilty to trying to plant in the spring. I only harvested a few monobulbs, but my garlic was kind of a lost crop last spring.
My garlic planted from last fall is huge. Much bigger than my garlic grown in the spring so far by about 8x. Garlic is suppose to be harvested and cured when the first few leaves start to turn yellow. That's the gist of what I know so far. They are tough little suckers. My garlic started growing during the winter with snow covering it. You will want to remember to fertilize them; otherwise, they are very hardy growers and require very little maintenance. |
|
|
|
|
April 24, 2016
|
#3 |
|
Tomatovillian
Join Date: Jul 2007
Location: Midway B.C. Canada
Posts: 311
|
The garlic growing information from our garlic web site.
Garlic growing is easy in the home garden. Maintaining top quality requires care and attention. Weeding is important as garlic does not like competition. Watering and not watering, harvesting on time and curing properly are all important for producing bulbs with good keeping qualities. The information on this web page and the Curing Garlic web page has been summarized on three printer friendly pages. Soil Preparation Garlic will grow under a wide variety of soil conditions. It is said to prefer free draining loam with lots of organic matter. Building up your soil with green manure cover crops as part of your normal crop rotation is good practice. We like to get all our amendments into the soil before planting. Compost and composted manure are popular choices. We use alfalfa meal and a small amount of ground fish bones. Selecting Your Seed We select our own seed first so that each year our average production is improving. We choose bulbs with a nice shape and plump cloves. In general, clove size is more important than bulb size as a determinant of future bulb size. Tip for Commercial Growers As a precaution we always plant new seed stock in an isolation patch, away from our main garlic patches, so that if there are any problems they are contained. New Seed It takes new seed stock several years to adapt to your growing conditions. For this reason we recommend that growers invest in modest quantities of excellent seed stock and multiply it up in their own fields. We have had good success growing garlic up from bulbils. For details see our page on growing from bulbils. When to Plant Garlic In Canada most varieties of garlic, under most conditions, do best when planted in the fall. The timing of fall planting should be such that the roots have a chance to develop and the tops do not break the surface before winter, about three weeks before the ground freezes. In some regions spring planting is traditional. Although we have planted in the spring with good results our short growing season means that the garlic is not ready for harvest in time to ship for planting. Spring planted garlic matures later than fall planted. Tip – In Warmer Climates Store Your Hardneck Garlic in a Cool Spot Before Planting Hardneck garlics need to go through a cold period to trigger sprouting. If your soil temperatures stay warm, store the garlic in a cool, dry place, 7 - 10°C (45 - 50°F), for about three weeks before planting. Preparing Cloves for Planting Shortly before planting break the bulbs apart into cloves. This is called ‘cracking’. The cloves are attached to the basal plate, the plate that the roots grow from. When you crack the bulb each clove should break away cleanly, leaving an image of a ‘footprint’ on the basal plate. With true hardneck garlics you can crack them by giving the woody stem a sharp rap on a hard surface. The root nodules begin growing from edge of the foot of the clove. If the basal plate stays attached to the clove you may be able to flick it off. Be careful not to damage the foot of the clove. It is more important to keep the clove intact than to remove the basal plate. Set aside the very small cloves to eat soon, to make into pickles, to dry, or to plant tightly together for eating in the spring, like green onions. Each larger clove will produce a good sized bulb by the end of the growing season. The smallest cloves require just as much space, care and attention in the garden and produce significantly smaller bulbs. Tip - Separate the Cloves just before Planting If you separate the garlic cloves as close to planting time as possible, preferably within 24 hours, the root nodules won’t dry out and the garlic will be able to set roots quickly. Planting Garlic You can plant garlic in single or double rows or in wide beds of four to six plants across with four to eight inches between plants. Tighter spacing in the beds will produce a greater number of smaller bulbs for a higher total yield in terms of pounds of garlic per square foot of garden. We have lots of land and plant garlic in well-tilled beds of five or six rows, with about eight inch spacing between rows and between plants. This bed size is comfortable for hand planting. Henry originally devised a roller that two people pulled over the bed to poke holes at regular intervals. Now we use one he built to tow behing our bed former. It is important to plant hard neck garlic with the top (pointed end) of the clove up, at least two inches below the surface. When you have planted the garlic you can cover it with a layer of mulch if you wish. Mulching Mulching conserves moisture, moderates soil temperatures and inhibits weeds. It also shelters rodents and attracts deer and elk. All these factors need to be considered in deciding whether or not to mulch. Mulching can even out the soil moisture between rains and irrigation cycles. It is not recommended in wetter climates where excess water can be a problem for garlic. Moderating soil temperature is helpful where there are extremes of heat and cold. Garlic does not like repeated freezing and thawing. Frost heaves can tear the young roots from the cloves. A thick layer of winter mulch is a good insurance against winter kill. Garlic does not like extreme heat either and mulch will moderate the daily fluctuations in summer soil temperatures. Chopped leaves, swamp grass, reeds and alfalfa hay are among the preferred mulch materials. Grain straw is not recommended because it can host wheat curl mite which will attack garlic. Grass hay is fine if you don’t mind lots of grass seed in your soil. In our area, around zone 4, growers put on about 10 cm (4”) of mulch in the fall for winter protection. Mulch may be chopped or not. By spring the mulch has settled to 5 cm (2”) which is enough for weed suppression and heat and moisture control. Where winters are harsher, thicker winter mulch is advisable and then some may need to be pulled back in the spring. We use grass hay straight from round bales. In recent years we remove the mulch in the spring as our summers have turned colder and wetter. If your summers are dry enough you can just remove some mulch where it is too thick. Some varieties find it easier than others to penetrate the mulch. Labelling the Garlic Beds It is very easy to lose track of which garlic is which. By using a combination of maps and markers we can always identify the garlic in the ground. Detailed maps show how much of each garlic is planted and where. UV resistant markers are used to write labels on sticks for each end of a bed or section of a bed. We leave space between cultivars. Tip for Tracking Garlic Varieties and Strains or Cultivars If you have a large number of varieties build in safeguards against mix-ups. For example, we put two Tyvek tags with the garlic identification on it in each harvest basket, one in the bottom and one where it can be seen. These tags stay with the garlic on the hanging strings and then in the horticulture boxes. Scapes and Bulbils Hardneck varieties produce a central stalk which goes straight up and then usually makes one or two loops. The garlic top is called a scape, garlic flower or top set, and contains a bulge where bulbils will form. The standard wisdom has been that if you want all the plant's energy to go into producing a large bulb, you snip the scape off after it has made one or two loops. However, in 2011 we discovered that not all varieties take kindly to this procedure. In particular, the Turban Variety of weakly bolting hardneck does MUCH better if the scape is left on until it is time to harvest the bulb. Not only were the bulbs bigger, they were in better shape. Our practice now is to leave the scapes on all our true hardneck varieties at least until they have made two loops and to leave the scapes on most of the weakly bolting hardnecks even longer. If you want to use the bulbils to propagate more garlic, leave the plants in the ground later than your normal harvest and leave the bulbils in place until they are pushing their capsules open. Harvest and cure the bulbs and bulbils separately if you want to avoid getting soil on the bulbils. Visit our page on Growing Garlic from Bulbils for further information. Tip - Steam or Stir Fry Garlic Tops The garlic tops, called flowers or garlic scapes, are a gourmet delight! Steam them whole and serve with melted butter like asparagus. Cut them into short lengths to add to a stir fry. They have a delicate garlic flavour which gives a subtly different and delicious flavour to the sauce. Watering Garlic Garlic requires fairly even soil moisture during the growing season with no additional moisture during the last few weeks. Mulch is one way of maintaining an even moisture regime. Not enough moisture means that garlic does not develop a full sized bulb. Over watering results in garlic with poor keeping qualities - poor wrappers, burst skins and mold. Also, it is harder to cure garlic that has been over watered. One of the arts of garlic growing is knowing when and how much to water. We leave a couple of early scapes on each bed and when they stand up straight that is usually one of our signals to stop watering. We stop watering two to three weeks after cutting scapes. Tip - Do Not Over Water If you want to keep your garlic through the winter, it is safer to stop watering too soon than to try to get the last bit of size to the bulbs since over watering shortens the life of bulbs. Harvesting Garlic A few weeks before harvesting stop watering the garlic. Different growers have different rules of thumb regarding the best time to harvest. The dying back of the leaves is only an approximate indicator. To determine whether the garlic is ready to harvest inspect a few bulbs in the ground by carefully scraping away the dirt. You can feel the bumps of the cloves through the wrappers of a mature bulb. Lift the garlic from the ground when the bulb has reached a good size and before the wrappers begin to deteriorate or the bulbs begin to split open. If a bulb is not well-wrapped, and the skins on the cloves are not intact, the garlic will not keep well. Learning exactly when to stop watering and when to harvest is a matter of judgment that comes with experience. We have a late spring and in our location in the mountains; we begin harvesting our earliest varieties in mid to late July. The main harvest continues into August, with the late varieties and spring planted beds being harvested in late August. We use a flat, narrow-bladed shovel to loosen the ground beside the garlic - we pierce fewer bulbs with it than we did with a fork - and lift the plants by hand. Be careful as garlic bruises easily. Garlic can get sunburned and some varieties of garlic change flavour when left in the sun and so we take each load of baskets of garlic into the curing barn as soon as it is harvested. For information on preparing garlic for sale or storage go to our Curing Garlic page. Tip for Tracking Garlic Varieties and Strains or Cultivars If you have a large number of varieties build in safeguards against mix-ups. For example, we put two Tyvek tags with the garlic identification on it in each harvest basket, one in the bottom and one where it can be seen. These tags stay with the garlic on the hanging strings and then in the horticulture boxes. Managing Garlic Beds for Pests and Disease There are a number of practices that minimize the risk of pests or disease. The ones we consider the most important are: Use only clean, sound cloves from disease-free stock. Carefully clean and sanitize all equipment for soil preparation, weeding, harvesting, handling and storing garlic. Allow at least two years, and preferably longer, between successive crops in the allium family (garlic, onions, leeks, chives, elephant garlic). During the growing season remove (rogue) plants that are not doing well and send suspicious plants to the dump. Sanitize your shovel after removing a suspicious plant. Do not put your allium waste in the compost.
__________________
Henry |
|
|
|
|
April 24, 2016
|
#4 |
|
Tomatovillian

Join Date: Jul 2013
Location: MA
Posts: 903
|
Henry,
Thanks so much for posting this info, super useful. |
|
|
|
|
April 24, 2016
|
#5 |
|
Tomatovillian
Join Date: Jan 2009
Location: selmer, tn
Posts: 2,944
|
Henry that is a very nice post with a lot of information. I would have liked that information when I started mine.
I just planted the stuff and transplanted others and today I have hundreds and have given away many. I mostly just leave it in the ground(it has a lot of self composted) leaves . Some of the plants are over three feet tall. Easiest thing I have ever grown. Jon : 
|
|
|
|
|
|
|


 View Public Profile
 Find More Posts by Ozark
 Linear Mode

