 February 7, 2016
|
#76 |
|
Tomatovillian

Join Date: Jun 2012
Location: Illinois, zone 6
Posts: 8,407
|
right now I dont even know if the scissors truss is the best idea.
It might be better if it was inverted so the big ends were on the bottom. It's the simplest and cheapest, and it looks to me like it would work. Can you post a drawing of the inverted idea? As far as bracing it the other direction, when I run the additional purlin bar down each roof side in the middle, that will help a lot. We can set a center post in the ground on the end walls, too, going up to the peak. We don't have to be able to fit a tractor in there. |

|

|
|
February 7, 2016
|
#77 |
|
Tomatovillian
Join Date: Jul 2014
Location: kentucky
Posts: 1,116
|
My tunnel is 20' wide, and was engineered to be free standing without load bracing to the bows. When I erected the frame it was quite strong, but I knew it wasn't strong enough for a freak snow fall. That's why I installed the joists and king posts essentially making a simple truss..good thing I did! Several of the same tunnels caved in last year due to the snow loads they received in last years snows. The company no longer makes snow load claims! Mine stood proud and strong.
Wind load is a different thing altogether with a quonset design tunnel. When wind hits a quonset in the side, the wind actually flows over the tunnel pushing it tighter to the ground. Lateral bracing to prevent racking is all that is required. |
|
|
|
|
February 7, 2016
|
#78 | |
|
Tomatovillian

Join Date: Feb 2006
Location: Den of Drunken Fools
Posts: 38,539
|
Quote:
 But I want to reply to your post now. The arch design works fine if the arch goes to the ground if it doesn't then the side walls take the load and get shoved out. What you did was a great idea as it stopped this.  Worth |
|
|
|
|
|
February 7, 2016
|
#79 |
|
Tomatovillian
Join Date: Feb 2006
Location: Den of Drunken Fools
Posts: 38,539
|
Lets forget the inverted scissors truss but I will show a picture anyway.
Better yet here is a link to truss styles. If you look each pictuer of a truss is a link to truss's. http://www.wbcomponentsllc.com/truss_types.php Look closely at the way the angles are set up and how a load will effect them. There are two ways to support something, brute strength or telegraph it to some place that can like the ground. This is what they did in the old days with what they call a flying buttress. When you support something you what things to push together not pull apart. I have seen gates that were either built wrong or put up wrong and the end up pulling themselves apart. The cross angle brace was going from the top on the hinged end to the bottom of the end of the gate. I just remember back a few years ago when someone asked about raised beds here and how to build them. I put my way out there and got hammered by someone saying it was over kill. 
|
|
|
|
|
February 7, 2016
|
#80 |
|
Tomatovillian
Join Date: Feb 2006
Location: Den of Drunken Fools
Posts: 38,539
|
|
|
|
|
|
February 7, 2016
|
#81 |
|
Tomatovillian
Join Date: Jul 2014
Location: kentucky
Posts: 1,116
|
I prefer overkill, myself..

|
|
|
|
|
February 7, 2016
|
#82 | |
|
Tomatovillian
Join Date: Feb 2006
Location: Den of Drunken Fools
Posts: 38,539
|
Quote:
Worth. |
|
|
|
|
|
February 7, 2016
|
#83 |
|
Tomatovillian
Join Date: Jun 2012
Location: Illinois, zone 6
Posts: 8,407
|
I see you have two runs of pipe down each roof side, and not one.
Also, your scissor truss has a vertical piece underneath it that was not in the first pic. I could get away without that? Attaching it might be difficult. Where the scissor trusses cross, I can just wire them together to keep from having to drill them. |
|
|
|
|
February 7, 2016
|
#84 | |
|
Tomatovillian
Join Date: Feb 2006
Location: Den of Drunken Fools
Posts: 38,539
|
Quote:
After all it is your greenhouse.  If it were me I would use a welder and benders because I have them. Then use my drill press and set up a pipe notcher and prefab everything. Not everyone has this stuff and we have to make do with what we have. Worth |
|
|
|
|
|
February 7, 2016
|
#85 |
|
Tomatovillian
Join Date: Feb 2006
Location: Den of Drunken Fools
Posts: 38,539
|
I also cant tell how many of the hoops or what ever they are you have.
I would think you might get away with doing the end bracing like I showed it on every other one or so. Just like you would see the support poles in a huge ware house. Worth |
|
|
|
|
February 7, 2016
|
#86 |
|
Tomatovillian
Join Date: Jun 2012
Location: Illinois, zone 6
Posts: 8,407
|
I looked into learning to weld just for high tunnels, but welding galvanized is so horribly toxic and dangerous, I don't want to get involved with it.
There's 13 purlins, four feet apart, total length of 48 ft. Top rail is about $1 a foot, so adding more pipe is not that expensive. However, the greenhouse-specific purlin clamps that hold crossing bars together, like at the peak, are expensive, $3.50 or so each. So the clamps cost as much as the pipe when adding another long-wise run. I'm trying not to drill and bolt the pipe very much, so as not to weaken it. We do need a drill press; we're figuring that out. Probably the extent of my metal-working skill would be to hammer the end of a piece of pipe flat and drill a hole in it so it can be bolted to a band clamp: 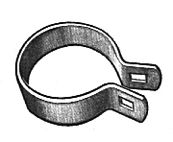
|
|
|
|
|
February 7, 2016
|
#87 |
|
Tomatovillian
Join Date: Feb 2006
Location: Den of Drunken Fools
Posts: 38,539
|
Welding galvanized isn't that bad you just grind off where you weld and stay up wind.
Been doing it for years.  I got you first picture from here and am working on it. Do you have 13 of these things in all? Worth |
|
|
|
|
February 7, 2016
|
#88 |
|
Tomatovillian
Join Date: Jun 2012
Location: Illinois, zone 6
Posts: 8,407
|
Yes, 13.
There are three rows of berries in it, so the very center has a row. I was thinking we'd have a center post down each end wall and a door on either side. It would not be out of the question to have a center post or two within the structure. The berries would grow around it, so I don't think it would be in the way. Also, setting an external post and running a wire to the peak to anchor it is not out of the question. |
|
|
|
|
February 7, 2016
|
#89 |
|
Tomatovillian
Join Date: Feb 2006
Location: Den of Drunken Fools
Posts: 38,539
|
Guy wires would alleviate a lot of problems and the simplest and cheapest way to do it.
That's how a cable suspension bridge gets its support. Of course when you are building a house no one wants them in their yard. Worth |
|
|
|
|
February 7, 2016
|
#90 |
|
Tomatovillian
Join Date: Jun 2012
Location: Illinois, zone 6
Posts: 8,407
|
I can get a 10' treated lumber 4x4 post and sink it 2-3' into the ground. If the wire starts at above head level, it won't be in anyone's way. The post can be incorporated into the berry fencing.
|
|
|
|
 |
|
|


 View Public Profile
 Find More Posts by Cole_Robbie
 Linear Mode

