General discussion regarding the techniques and methods used to successfully grow tomato plants in containers.
|
 |
|
|
Thread Tools | Display Modes |
 May 15, 2013
|
#1 |
|
Tomatovillian
Join Date: May 2013
Location: So California
Posts: 75
|
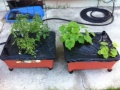
 I snuck a new tomato plant in the trolly at Home Depot last night and hubby let me have it. I snuck a new tomato plant in the trolly at Home Depot last night and hubby let me have it.I was only meant to be buying stuff for the Cabbage loopers on my zucchini (which they had none of bar the dill plants to attract ladybugs...no ladybugs and no BT  ) )I want to plant it in a container like my other three tomato plants (which I think are determinate) and the Zucchini. Those plants are in two City pickers Self watering planters. these are the planters  http://www.homedepot.com/p/CITY-PICK...5#.UZPtiaLvjTp The new tomato plant is a Indeterminate Bradley heirloom. Once planted it will have to sit on the concrete patio. anywhere else and it will get hit by a garden sprinkler. Oh and I'm located in the Westside of Los Angeles and Garden faces north east I think. Just to give a better idea of climate and weather and heat I'm dealing with (not sure if not having it on casters will heat the pot up too much?). I could go back to Home Depot and get a third City pickers planter as the self watering system really suits me and it seems the plants. plus they are on casters and easy to put together. but they cost $30. which for just the container and no potting mix is a little steep for one plant.  but if I opt to make my own...looks like a lot of drilling and glueing?  and I need something i can put together quickly before my toddler notices that both parents are not at her beck and call. and I need something i can put together quickly before my toddler notices that both parents are not at her beck and call. any experienced container growers can help me decide what to do? or tips? Suggestions? Thanks in advance 
Last edited by SmittenGarden; May 15, 2013 at 04:51 PM. |

|

|
|
May 16, 2013
|
#2 |
|
Tomatovillian
Join Date: Mar 2013
Location: SeTx
Posts: 881
|
A simple SWC is a five gallon bucket with holes drilled in the bottom for wicks and a second bucket as a reservoir.
You could buy a 16" SWC from Walmart for around $15. My dets are happy in the 13" version, but I think the 16" would work better for an indet. - going to be filling that reservoir a lot, though. I've made a SWC by inverting a nursery pot inside a watertight container. Only drilling was a overflow hole on the side of the outermost container. You could make a simple cedar fence picket box, even, and line it with plastic and a nursery flat. My toddler thinks it's hilarious when I hammer things (but is terrified of the drill). Really, it comes down to more fuss, less cost, vs. less fuss, more cost. Something I wrestle with. And somebody out there thinks gardeners have tons of disposable cash, because prefab stuff always costs 10x more than it would to make myself!Tl |
|
|
|
|
May 18, 2013
|
#3 | |
|
Tomatovillian
Join Date: May 2013
Location: So California
Posts: 75
|
Quote:
I'm not that handy at drilling and such.But I might just try making my own.... I found a how to on line with a guy in UK making one out of two recycling boxes and pipes. The boxes are pretty much plastic storage bins without lids. So I thought I could buy two of those cheap and a bit of pipe and make one..... I just have to figure out first where dh put his drill and ends for it to cut and drill holes and also how to make the dips for the soil to wick. 
|
|
|
|
|
|
May 18, 2013
|
#4 |
|
Tomatovillian
Join Date: Mar 2013
Location: SeTx
Posts: 881
|
No, no, it's not that hard. Get the planks, have the Home Depot guy cut them into pieces. Nail together. Done! You can nail plywood or more pieces to the bottom.
If it required skills I'd never do it. I found the only drilling I needed for my SWCs was the overflow hole, and I could have melted the holes with a heated screwdriver, I just wasn't patient enough, I built a couple using this site's basic principles: http://www.insideurbangreen.org/diy-sub-irrigation/ You don't necessarily need soil cups, you can use cloth or rope as a wick. I think some people use nylon mop strings? Tl |
|
|
|
|
May 18, 2013
|
#5 |
|
Tomatovillian
Join Date: Mar 2012
Location: Allentown, PA
Posts: 349
|
Setting up a self-watering container with 5-gallon buckets (or any two containers of the same size that will stack inside each other) only takes a matter of minutes. Much less time intensive than building an EarthTainer. You will need:
1. Two buckets (about $2.50 each at Lowe's; or free if you ask around at restaurants). 2. A standard yogurt cup (such as Dannon, which seems to fit perfectly; free). 3. Two zip ties (maybe $1 for a bag). 4. Landscape fabric (hopefully you don't have to buy an entire roll for this purpose). 5. A drill and a hole saw bit set (you can buy a cheap one at Harbor Freight). 6. PVC pipe (<$4 for 10') and some way of cutting it (pipe cutter, hacksaw, jigsaw, or have the store do it). Steps: 1. On outer bucket, drill a hole about 1" down from where the bottom of the inner bucket will sit. You're done with the outer bucket. 2. On the bottom of the inner bucket, drill a hole with the hole saw that is just smaller than the diameter of the yogurt cup you are using. Then drill a hole with the hole saw that matches the width of the PVC pipe (probably 1" or thereabouts). Using a 1/4" drill bit, drill a bunch of aeration holes surrounding the two bigger holes you just made (probably a good 20-30 holes). 3. Drill a single hole (1/4") on the sidewall of the yogurt cup, toward the bottom. Then, drill little holes on opposite sides of the top of the yogurt cup, just big enough for your zip tie to fit through. Hold the cup to the underside of the inner bucket and mark, just outside the rim of the yogurt cup, where the holes on the cup are. Then drill these holes through the bucket bottom, then attach the yogurt cup using the zip ties. 4. Cut a section of the PVC pipe so that it is long enough to go all the way from above the top of the inner bucket to the bottom of the outer bucket. Drill two holes at the bottom of the pipe so water can flow out. 5. Cut landscape fabric to the diameter of the bottom of the bucket, and cut a hole so that the pipe can go through. 6. Follow EarthTainer guide for filling your bucket. Good luck! Last edited by elight; May 19, 2013 at 10:27 AM. |
|
|
|
|
May 19, 2013
|
#6 |
|
Tomatovillian
Join Date: Apr 2013
Location: SF Bay Area
Posts: 40
|
Can you offer some more details? I'm afraid a parts list alone doesn't get me there!
|
|
|
|
|
May 19, 2013
|
#7 | |
|
Tomatovillian
Join Date: Aug 2011
Location: Plantation, Florida zone 10
Posts: 9,283
|
Quote:
Marsha |
|
|
|
|
|
May 19, 2013
|
#8 | |
|
Tomatovillian
Join Date: Mar 2012
Location: Allentown, PA
Posts: 349
|
Quote:
Let me know exactly which parts of the steps need clarification and I'm happy to expand upon them. I also have some buckets that I'm not using this year, so I will take some photos later today and post them for visual reference. Also, one item I left off the instructions (will edit it now): drill a single 1/4" hole on the side of the yogurt cup, toward the bottom, so that water can get in! |
|
|
|
|
|
May 19, 2013
|
#9 |
|
Tomatovillian
Join Date: Mar 2013
Location: SeTx
Posts: 881
|
Couldn't you just melt or drill a dozen or so holes in the bottom of the inner bucket for aeration/drainage, then stick a few lengths of rope/mop string/torn T-shirts through a few of the holes into the reservoir? Skip the cup wick entirely?
I appreciate the bucket advice, I'm going to Home Depot tomorrow and making a shopping list. Tl |
|
|
|
|
May 19, 2013
|
#10 |
|
Tomatovillian
Join Date: May 2013
Location: So California
Posts: 75
|
;Thanks for the guide. I told my hubby..... Took one look at me and said "I'm not going out and getting cut pipping and drilling holes in boxes when I can buy another one of those for $30."
So I'm taking that as I'm allowed to spend money on a pre made container right? You know like Homer Simpson said to marge "you laughed I'm off the hook" 
|
|
|
|
|
May 19, 2013
|
#11 |
|
Tomatovillian
Join Date: Mar 2013
Location: SeTx
Posts: 881
|
I've had that conversation!
The problem is that one more $30 container is okay, maybe two... but when you're staring at 56 seedlings, cheaper & DIY looks a lot more appealing. Tl |
|
|
|
|
May 20, 2013
|
#12 | ||
|
Tomatovillian
Join Date: May 2013
Location: Natalia, TX
Posts: 143
|
Quote:
Quote:
What size containers are you wanting to use? How about one 5 gl. bucket, with a 4" deep reservoir, you will use less soil-less mix. No need for Yougurt cups, net pots, etc. No need for Landscape Fabric. No need for Zip ties ether. |
||
|
|
|
|
May 20, 2013
|
#13 | |
|
Tomatovillian
Join Date: Mar 2012
Location: Allentown, PA
Posts: 349
|
Quote:
To answer tlintx's question about wicks instead of a wicking basket... yes, you could certainly do that. It seems many people have done so successfully, I've just never done it myself, so I can't really speak to the pros and cons. I would love if someone could share their experience using wicks instead of a wicking basket! And maybe Raybo could chime in as to why he chose the wicking basket for the EarthTainer instead of wicks. |
|
|
|
|
|
May 20, 2013
|
#14 |
|
Tomatovillian
Join Date: Mar 2013
Location: SeTx
Posts: 881
|
I know you can use an inverted nursery pot as a reservoir in just about any container, but I haven't done it 100% successfully yet!
|
|
|
|
|
May 20, 2013
|
#15 |
|
Tomatovillian
Join Date: Mar 2012
Location: Allentown, PA
Posts: 349
|
I'm not following how that would work. Do you have a visual, or is there a link to something similar?
|
|
|
|
|
| Tags |
| los angeles |
|
|


 View Public Profile
 Find More Posts by SmittenGarden
 Linear Mode

