General discussion regarding the techniques and methods used to successfully grow tomato plants in containers.
|
 |
|
|
Thread Tools | Display Modes |
 May 25, 2015
|
#16 | |
|
Tomatovillian
Join Date: May 2015
Location: SW Missouri Zone 6b
Posts: 121
|
Quote:
The only downside is that the castors were almost as much as the containers, as the troughs themselves were actually pretty cheap compared to a couple of nice-looking plastic planters that held a small fraction of the volume. Still, having them mobile is worth it as I can move them to shade, sun, under an overhang if it hails, etc. Thanks for the post, I am looking for all the advice I can get 
|
|

|

|
|
May 26, 2015
|
#17 |
|
Tomatovillian
Join Date: May 2015
Location: SW Missouri Zone 6b
Posts: 121
|
I hope to use this thread to track this experiment throughout the season, and maybe someone down the road will learn something from it - like never try it!
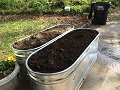
 Though I hope that's not the lesson learned in the end. Either way, it is a fun sort of journal for me, and maybe some of you will find it interesting too. Though I hope that's not the lesson learned in the end. Either way, it is a fun sort of journal for me, and maybe some of you will find it interesting too. I've already learned lots of things I'll be doing differently next year thanks to the forum, but this is what I've got for this season. Here's some pics of how the plants are faring so far after a little over a week in the trough, lots of rain, some TFF and finally a warm sunny day to help dry them out and give them some warmth. I had hoped for a bit more growth, but maybe I'm just being impatient. The pics are nothing super exciting, as there's not that much that has changed. It's only been a little over a week after all. But, I like taking pics of my plants at various stages, and I'm pretty sure I'm not the only one on the TV forum who does  Thanks to all who check out this thread and if you want, please share any thoughts, criticisms, suggestions, etc, so I can do better next year! |
|
|
|
|
May 27, 2015
|
#18 |
|
Tomatovillian

Join Date: Jan 2013
Location: Jacksonville, FL
Posts: 1,413
|
They look very healthy, whatever you are doing keep it up.
What part of MO are you? My first garden was in Rolla. |
|
|
|
|
May 27, 2015
|
#19 | |
|
Tomatovillian
Join Date: May 2015
Location: SW Missouri Zone 6b
Posts: 121
|
Quote:
|
|
|
|
|
|
May 27, 2015
|
#20 | |
|
Tomatovillian
Join Date: May 2015
Location: SW Missouri Zone 6b
Posts: 121
|
Quote:
Interesting town though I've never seen such a big St Patrick's day party - no wait, week of parties - anywhere else except perhaps Ireland. Rolla loves that holiday in a most particular way. Sorry, that's way off topic, but it left an impression on me that I remember whenever I think of that place  Back to the thread: Thanks for the encouragement about the plants! They were even bigger today and I am hopeful that the growth can continue in the dense conditions without issues, given the setup and some serious pruning. I discovered and researched a lot about the PWT concept last night (starting from the Garden Web articles - i hope I can mention that here), and it terrified me! I am now afraid I used a terrible mix instead of simply a less than optimal one. My containers are quite saturated currently, so I'm not adding the water-soluble TTF. Although if the PWT stays roughly the same no matter what, and the gravitational pull of water through the medium helps increase oxygen amounts in the mix (as I have read about on other sites, but may not be true) I wonder how detrimental adding a small amount of fertilized-water might be. Also, we also haven't seen the extreme temps here yet that I'm sure you remember from your time in SW MO. I have some ideas, and many questions, about how destructive the PWT issue is, or how it might be remedied, in a very large container like mine (perhaps even utilized when plants are bigger and the weather hotter). I'll search for some existing info here on TV. I just haven't seen much advice anywhere online concerning containers over 25 or 30 gallons. Thanks to all who read or share their thought's! |
|
|
|
|
|
May 28, 2015
|
#21 |
|
Tomatovillian
Join Date: Mar 2015
Location: Raleigh, NC
Posts: 205
|
If you had to, you could add a wick just by sticking a few lengths of rope or fabric into some of the drainage holes, and use a screwdriver to make sure it gets past the rock and weed fabric layer to the soil. Problem solved.
Have you seen it draining after watering? |
|
|
|
|
May 28, 2015
|
#22 | |
|
Tomatovillian
Join Date: May 2015
Location: SW Missouri Zone 6b
Posts: 121
|
Quote:
Yes, it drained pretty much immediately after I poured a 5 gallon bucket of diluted TTF around the trough the other day. We have also had some light rains here fairly often, but the last few days have been sunny and getting warmer (mid 80's). The medium is clearly still quite moist/saturated. Do you think the wick would be best stuck in the bottom? Due to size and container weight, it sure would be easier on me to drill a new hole or two on the side close to the very bottom, just above where I think the layer of small rocks and weed guard might be. Would that be any less effective? Any ideas on how deep would a wick have to penetrate the mixture to be effective for a container this size? Or perhaps would several wicks be better due to the mixture volume, 170 gal, or doesn't it matter? Sorry, that was a whole lot of questions in a row Also, I've read a few posts suggesting I may want the PWT for hot weather/droughts, but since I have an automated system already in there with a soaker hose on a programmable timer, I can't imagine why I would need it. Then again, that's why I ask. Because I don't have a clue  I have a post in a container growing mix thread that I am hoping will get some more perspectives, but what you suggest seems to make the most sense to me. I love taking and sharing pics, so I'm sure I'll post whatever I end up doing. Thanks for your response! All thoughts are very appreciated. Last edited by squirrel789; May 28, 2015 at 02:15 AM. |
|
|
|
|
|
May 28, 2015
|
#23 | |
|
Tomatovillian
Join Date: Mar 2015
Location: Raleigh, NC
Posts: 205
|
Quote:
|
|
|
|
|
|
May 28, 2015
|
#24 |
|
Tomatovillian
Join Date: May 2015
Location: SW Missouri Zone 6b
Posts: 121
|
I think I will wait a bit and see what happens, and try to learn more about the PWT and it's effects. There's not a lot of info out there on the net besides sites that repeat what has already been said on the GW forum. And no info at all on container gardens my size.
Unfortunately, its supposed to rain here for the next 3 days, so it might be awhile before I get to see if the soil ever starts to dry out. Then again, the meteorologists around here aren't known for their accuracy. There is a silly saying in MO (and maybe other places) that goes: if you don't like the weather, wait 5 minutes.  Since I planted my starters about 14" deep vertically, I'm extra concerned about the roots sitting in water and rotting, and I have no idea how deep the PWT is. But they do look like they're alright so far! I swear they are taller every morning, so they must like something I've done so far  Truly, thanks again for the advice. I tend to get overly paranoid/obsessed about my tomatoes because they are, IMHO, one of my favorite parts of summertime for many reasons... This forum is truly a goldmine of info, opinions, ideas, and sometimes laughs. My only regret is I didn't find it before I started my containers. |
|
|
|
|
May 29, 2015
|
#25 |
|
Tomatovillian
Join Date: May 2015
Location: SW Missouri Zone 6b
Posts: 121
|
As this thread has become somewhat of project journal for my first container garden, I wanted to share what I tried today in regards to my concern over my potential perched water table issue. Newly acquainted with the concept of the PWT and still unsure of exactly what effect it may have later in the season, if any, I posted a few questions/thoughts in another thread about homemade soil mixes.
http://www.tomatoville.com/showthread.php?t=31658 I know many people grow in all sorts of poorly draining mediums, even the MG moisture control stuff I read is terrible, and are still able to have some success. I also realize that I will likely get some tomatoes, and hopefully the PWT isn't the huge issue it I thought it would be after reading the articles I read on the "other garden" web forum recently. I've already decided to change my growing medium next season and hopefully have a more successful tomato garden next year. I am still going to try to make the best of this season though too, despite using what I think to be an overly-soggy and under-aerated soil mix. To get to the point, I decided to see if I could install some sort of wicking system (post-planting) for my tomato container to help this year be the best it can with a moisture-retentive mixture that likely lacks optimal medium aeration and will probably cause at least some root rot. For anyone interested, this is what I did, though I am still unclear on the effectiveness of my method or even the necessity of it. I would truly appreciate any opinions or advice. Perhaps I am making overthinking again, but I see how the pros here strive for perfection and I think we all want that for our gardens .So, my troughs have a 1' drainage plug on the bottom sides. As fonesca suggested, I removed the plug and using a screwdriver with a 12 length (not including the handle), I got past the rocks and weed guard and inserted a length of woven nylon rope into the medium at about a 45 degree angle as far as I could. Basically, I tried to get it to the center of the mix, and the angle meant it stretched through an area at least 6 or so inches above the rock/fabric layer. As the section of nylon I had was somewhat short, I let it dangle out of the opening and immediately noticed the part protruding was wet. To encourage the wicking process, I wrapped some very absorbent paper towels around the end of the wick (maybe this helped, or maybe not, but it seemed to make sense). Any suggestions on better/faster wicking materials would be great! Something that won't rot (like cotton) would be nice too if possible. I was very curious to see how much water I might be able to wick out. As I understand it, a fine-particle mixture like mine in a container surely has a PWT, and I wanted to see if I could make a difference as it seems that the more research I do, the smaller the PWT is, the better. It took around 3 hours for the paper towels to be totally soaked, and it was not near the volume of water I expected given my large container size. Perhaps one wick isn't enough, or maybe it just takes forever for the water to wick away given the mixture I used? I've read that fine particles don't want to release water easily, plus I have moisture-retaining peat, and course vermiculite instead of perlite. Although we received some brief rain earlier today, there was no water dripping from the drainage holes when I installed this. Does anyone think this is an important thing to worry about, or that I am really doing any good with a single wick buried halfway into the middle of a 170 gallon container? Would more wicks be better, or perhaps placed/installed differently? Does the wick need to be in contact with the ground? Although the troughs are on castors and can be moved, it would be a pain - but not impossible - to get the wick into the earth due to how things are arranged on the patio and how my watering system was installed (before I even knew what a PWT was). Sorry for all the questions, but I would really like to make this investment last me for years and to improve my method as much as possible. I am already looking at the more coarse 3-1-1 pine bark mixture for next year as the pine is easily available here, and the reasoning behind this famous growing mixture seems sound if you've read through Tapla's articles. I plan to leave the piece of thin rope there for awhile, slowly wicking, until I can figure out if the PWT is truly the problematic issue I am afraid it could be, or until I can come up with a better methodology to reduce/remove the PWT short of starting over, which is not really an option for me at this point. I have included pics of what I did, and I will continue to show the container garden's progress in this thread, assuming this is is the right place for it. I just noticed that most members keep their garden journals in the photo gallery section, so I hope its OK to just continue to post here. If not, please advise. Any thought or advice is always appreciated! Happy growing to all of you, I'm sure many of you are really seeing your plants start to take off! |
|
|
|
|
May 29, 2015
|
#26 |
|
Tomatovillian
Join Date: Jun 2013
Location: ny
Posts: 1,219
|
What is the wick for to help drainage? Or to suck up water, if that little jar is full? People making SIP use a pellon material or poly-cotton rope but imo, with what you have now, it won't be effective in anything. (you'll need a lot strips and then I believe your drainage holes at the bottom will work against that. Your supply will need to be located higher than your drainage holes too but for starters the drainage holes at the bottom works against this. You need an overflow hole at the side of SIPs.) Anyway, things to keep in mind, a wick is effective for distributing water via capilary action (peat moss!) for an approx cube of 12x12x12inches - imo, that's why 5-gallon buckets are quite perfect due to the depth of it.
I am all about subirrigated container gardening. Its the only way I can grow stuff in a small plot in a big city (and be at work all day long.) Basic single SIPs are like Raybo's earthtainer and then there are global buckets and alaska grow buckets. My personal favorite is Larry Hall's rain garden grow system to familiar - tons of fun on youtube land where his channel is located.
__________________
Subirrigated Container gardening (RGGS) in NY, Zone 7! Last edited by luigiwu; May 29, 2015 at 07:43 AM. |
|
|
|
|
May 29, 2015
|
#27 | |
|
Tomatovillian
Join Date: May 2015
Location: SW Missouri Zone 6b
Posts: 121
|
Quote:
I was actually attempting to aid in drainage of the perched water table. I am finding out that my mixture may be too moisture retentive, based on threads I've read here and all the perched water table info on the GW forums. It very well may be pointless, and given the size of the container, the PWT may not have much of a negative effect at all. I guess that is what I have been trying to figure out. The articles about the perched water table over on GW, make it sound like if you don't use the 5-1-1 mix or something similar with all large particles, that your container garden could be severely impaired by water retention and rotting roots. It all sounded pretty darn scary to a someone who's never tried any container gardening before As for the little jar with the paper towels, it was only temporary. I was trying to see if/how much the piece of rope was actually drawing moisture out of the soil. I am not trying to sub-irrigate via the wick, but completely the opposite. I was making an attempt to help the soil drain better. I guess I got a bit paranoid that my moisture-retentive growing medium may be harboring a large perched water table, According to the rather scary articles I've been reading about the PWT concept, if true, it would effectively shorten the depth of my growing space, or worse, lead to rotting roots eventually. Whether or not the perched water table is even something I need worry about in a container setup like mine, is really what I am trying to learn. Thanks! |
|
|
|
|
|
May 29, 2015
|
#28 |
|
Tomatovillian

Join Date: Apr 2015
Location: Tacoma, WA
Posts: 245
|
So one thing to keep in mind is that the Tapla 5:1:1 mix and self-watering containers are basically the opposite ends of the spectrum in terms of philosophy. And people out there do well with both, so neither is wrong. If you use 5:1:1, you better like watering haha.
The reason I have been experimenting with 5:1:1 rather than SWCs is it's more appropriate for my part of the country. Up here plants can sit in the cool weather with soggy roots and potting soils that are peat-based, I have poor results. That doesn't mean nothing grew. It's just that it grew BETTER in 5:1:1. There's unquestionalbly a PWT in your container, but you don't have to panic about it. The nice thing is, soon it will be warm where you are and the peat based mix will be an asset. I think you want the wicks to be in the bottom of the container, not the very middle. That's so it can actually wick away the PWT, which wouldn't be in the center. I also think a natural fiber might be more effective. As I said earlier I don't really know since I haven't done wicks, but that's my impression. This situation is a demonstration of why it's nice to start small when you're doing something for the first time. You never get it right. You often get it horribly, horribly wrong at first. It's cheaper and easier to experiment on a small scale. The way you bypassed flowerpots and went straight for the troughs is kind of like learning to drive on a semi-truck rather than a car!
__________________
Jenn |
|
|
|
|
May 29, 2015
|
#29 |
|
Tomatovillian
Join Date: May 2015
Location: SW Missouri Zone 6b
Posts: 121
|
Wormgirl,
Thanks for the advice, and I think you are correct as usual. I likely should have started out a bit smaller. I didn't realize until recently I could grow the varieties I wanted in smaller containers. I mean, I've done plenty of simple containers before with herbs, not-so-tasty dwarf patio tomatoes and MG potting soils. For better or for worse though, sometimes it's exciting and fun to make a jump into unfamiliar territory . Plus, I've enjoyed every step so far, even when I've made some ignorant or impulsive decisions, and I absolutely love having a garden just outside my back door! I may not succeed to the extent I originally hoped, and I'm OK with that, I just want to learn as much as possible along the way. And I have certainly learned a LOT so far.I have all the great people here on this forum to thank for that! I'm not going to stress about PWT thing anymore, as the plants are growing steadily and look good and healthy so far. I will also lower the spot where the wick is located, as now it pretty much runs from the center of the container (1' in and about 6-8'" above the bottom liner) diagonally down to the drainage plug on the bottom. I assume that is what you meant by putting it in the bottom (please correct me if I misunderstood). I just want it above that silly rock/weed guard layer I erroneously put there. I think it makes sense that the PWT would be in the area just above the mucky weed guard anyway. As for the wick, I will look into another material. I had been advised to use something synthetic, braided nylon or polypropylene specifically. The advice wasn't from TomatoVille though, so who know's how accurate that info was Thanks to everyone for the all the great advice, and for being patient, informative, and positive, especially to a new member. I'll still keep posting some updates/pics periodically and I guess we shall see how it plays out. Thanks! |
|
|
|
|
May 29, 2015
|
#30 |
|
Tomatovillian
Join Date: Jun 2013
Location: ny
Posts: 1,219
|
If PWT is what you are worried about then add holes along the side. something to think about all of subirrigated container gardening rely on it being "wet" on the bottom. I realize you are not doing subirrigated container gardening but what I'm trying to say is that its okay to keep some moisture on the bottom. What happens instead is there are side holes that work as 'overflow' holes... (I can go on and on about the benefits of how subirrigated gardening lets plants decide how much water to take up - so it leaves "human error" out of the way but I'll refrain...
)
__________________
Subirrigated Container gardening (RGGS) in NY, Zone 7! |
|
|
|
|
|
|


 View Public Profile
 Find More Posts by squirrel789
 Linear Mode

