

|
Discussion forum for the various methods and structures used for getting an early start on your growing season, extending it for several weeks or even year 'round.
|
 |
|
|
Thread Tools | Display Modes |
|
|
#1 |
|
Tomatovillian™
Join Date: Jan 2014
Location: Tomato Cornhole
Posts: 2,550
|
I posted pics in the Photo Gallery and a few people had questions so I'm posting a start to finish tutorial with exactly what I used. Let's start with a parts list and then I'll go over the process with a few pictures. There should be enough pics of everything I explained and if you have questions just ask.
This seems like a long process but it's not, it goes fast since most of it is repetitive. Parts needed: Reservoir, http://www.homedepot.com/p/HDX-27-Ga...NE-5/205978361 $11.97 2" pvc pipe for the return, http://www.homedepot.com/p/2-in-x-10...1137/100161954 $7.24 2" pcv elbow, http://www.homedepot.com/p/2-in-PVC-...7HD2/100343360 $.92 2" pvc cap, http://www.homedepot.com/p/Charlotte...00HD/203811678 $1.64 1/2" cpcv pipe for bucket drains, http://www.homedepot.com/p/Charlotte...0600/100170202 $3.98 1/2"cpvc pack of elbows, http://www.homedepot.com/p/1-2-in-CP...4707/100175252 $1.97 1/2 in. x 50 ft. Poly Drip Tubing, http://www.homedepot.com/p/DIG-1-2-i...-B35/100175565 $7.97 1/4 in. x 50 ft. Poly Micro Drip Tubing, http://www.homedepot.com/p/DIG-1-4-i...B38P/100170444 $4.27 1/4 in. Hole Punch, http://www.homedepot.com/p/DIG-1-4-i...-D44/100130448 $2.07 1/4 in. Barb Connectors (50-Pack), http://www.homedepot.com/p/DIG-1-4-i...H80B/100112605 $4.95 36 in. Heavy Duty Tie - Natural (10-Pack), http://www.homedepot.com/p/36-in-Hea...D-10/203531934 $5.97 Hillman Group Rubber Grommets 1-1/8OD x 5/8ID, http://www.lowes.com/pd_139360-37672...ductId=3013199 $1.04 264 GPH Submersible Fountain Pump, http://www.harborfreight.com/264-gph...ump-68395.html $18.99 Lamp and Appliance Timer, http://www.harborfreight.com/lamp-an...mer-40148.html $4.99 5 gallon paint strainers, Sherwin Williams has them in stock, the non elastic type is cheaper and they sell them in singles. http://www.sherwin-williams.com/home...r-elastic-top/ $7.90 Perlite, go to a feed n seed store and buy in bulk. Most have them in stock. It should come in a 4 cuft bag for about $20 and that will be enough for 12 buckets. Calcium Nitrate should be also available at your local FnS store, Southern Ag sells 5lb bags for about $10 Masterblend is the most expensive part besides a greenhouse. Morgan County Seeds has it. I ordered a 25lb bag for about $48.00 last year and that included shipping. I still have over half of it left and expect to get another 3 years out of it. Epsom Salt is everywhere I bought a meter to check PPM and PH but found it's not required but if you would like to have it then here's the cheapest I found and this is what I have. http://www.ebay.com/itm/US-Digital-P...-/231676009328 Buckets, I'm using the free buckets that bakeries get icing in. Walmart and Sam's are a good place to start. They only need to be about 3 gallons, I have 3 plants in 1 bucket and it works fine. You can use anything handy to make the platform, I used 1 2"x4"x10' & 1 2"x8"x10', I'll show pictures of how I put it together Next is the blocks to set the platform on, I had old 8" pipe laying around so I just cut it to make it work but any blocks will work. It has to be taller than the reservoir unless you bury the reservoir then measure accordingly. WOW, this is turning into a project researching!! Now the easy part. I cut the 8" pipe to 14" and set them on a 12"x12"x4" block for the platform. Any platform will work, wood framed or 2 Cinder blocks. I screwed the 2x4 to the 2x8 on it's side, this gives it more strength and makes the top 9" wide. This also gave me a flat surface to ziptie the drain pipe. 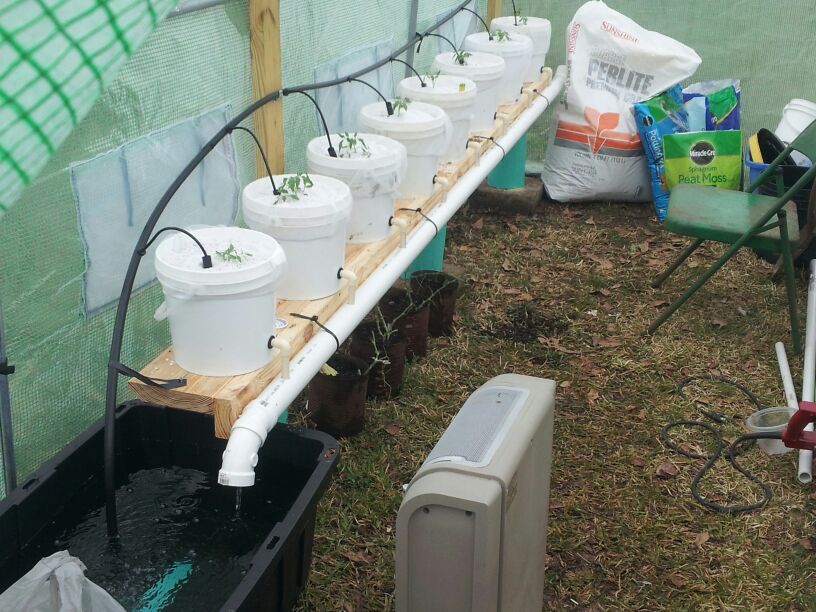 I changed the routing of the 1/2" poly feed line, it tucks nice between the bucket drain and the zipties 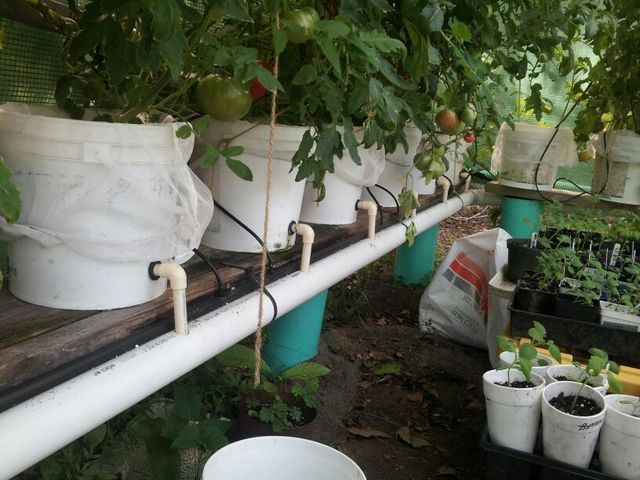 After you set the platform on the blocks, level it and set the reservoir in place, I cut the top just like Booby did and it works fine. I can remove the lid to refill and not have to remove the drain fitting. This is cut 11" x 14" but any size will work 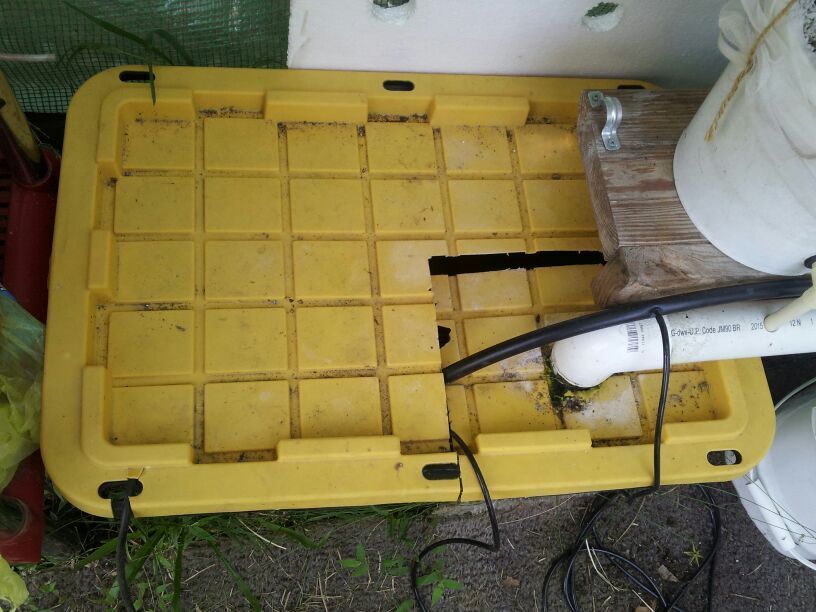 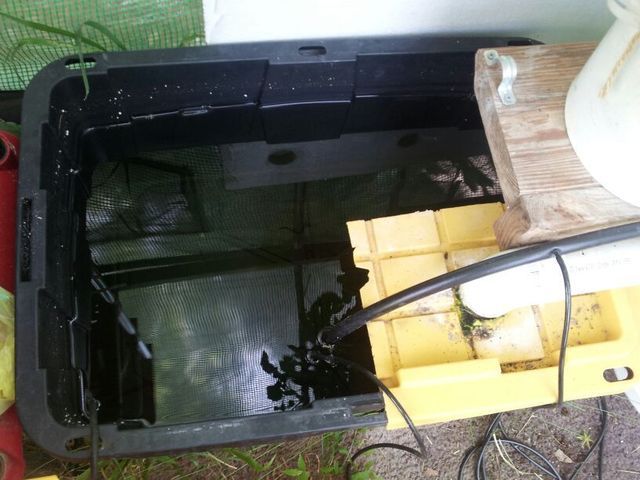 Drilling the bucket drains are next, to make it easy to get a starting point for the 1st hole I installed a ziptie at the end of the platform to hold the pipe while I got in in position. You can use any method to install the 2" drain pipe, I had zipties and it was quick and easy to get a slight drop so it drains. I just tightened the last ziptie up and much as I could and then made sure I had a drop then tightened the others. Install the 2" elbow on the pipe and position it where you want the drain in the reservoir, Don't glue anything, they don't leak and you can always change things later if you need to. Once you're happy with the drain then mark your 1st bucket drain location. Now we have a starting point, remove the pipe and elbow, set it on a table to drill 3/4" holes at 20" apart. To get a straight hole pattern, use the markings on the pipe to drill the holes. You can see the manufacturers marking on the top of the 2" pipe, make your marks and drill away. 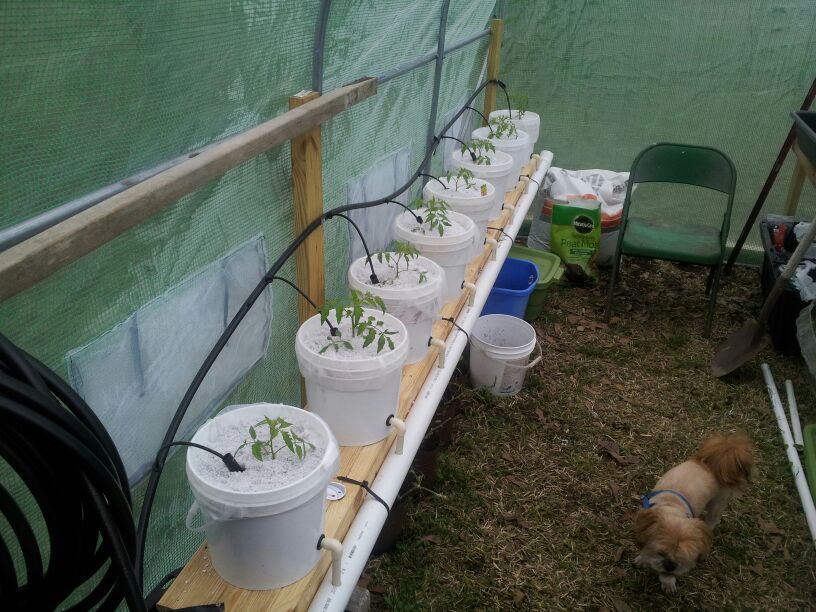 I know from the above pic that spacing looks good but it's too close. I drilled 3/4" holes every 15" for the bucket drain but it really needs to be at least 20" to get more airflow and light to the plants, this is like a jungle. 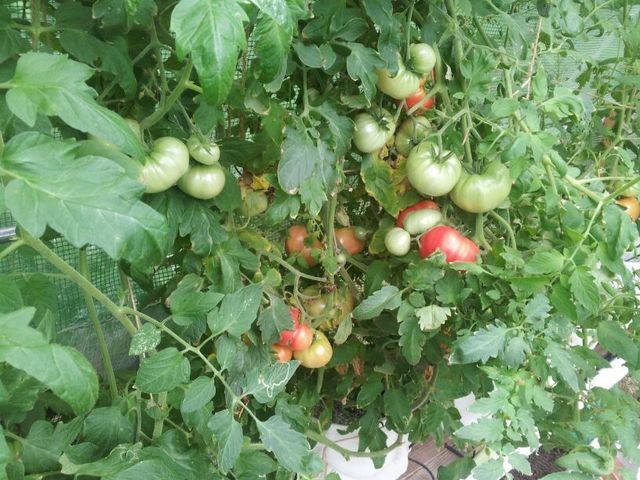 Next put the pipe back in place and secure it with the zipties so that it's lower on the reservoir side to allow it to drain, install the elbow and end cap. I drilled a 1/2" hole for the zipties, you can see in the pics that I just drilled through the 2x8 and ran the ziptie around the 2x4. Depending on how much distance you have between the 2" elbow and reservoir, you may need a short piece of pipe to connect to the elbow to go into the reservoir lid. A short piece cut off the end of the pipe should work. Just measure to make sure it fits. I used the 3/4" drill bit and tin snips to cut the hole in the lid for the drain, a 2 1/2" holesaw will work and be much easier. Time for buckets, I drilled a 3/4" hole 2" above the bottom for the grommet. I tried to turn the bucket so the handles were on the side, this is where I tie the strings for support and I used tomato clips but you can just wrap the string around the plant as it grows. I also use the handle to wrap the 1/4" water line around for each bucket. 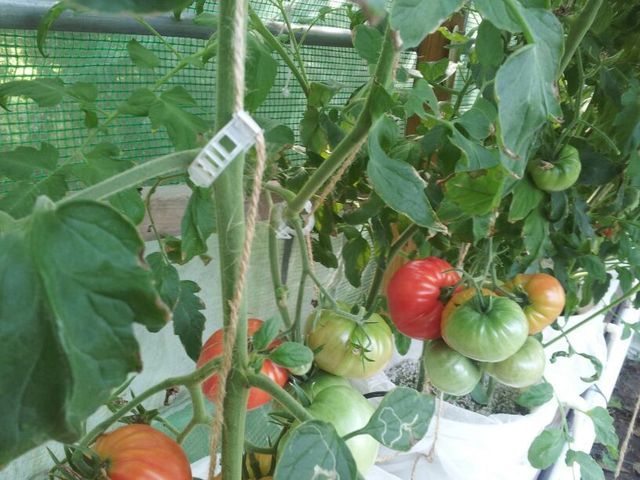 Install all the grommets, it's a little tight but not hard to get them in. Next I cut a 6" piece of the 1/2" cpvc, this will go through the grommets and then connect an elbow to each end. Set all the buckets in place and measure to cut pieces from the elbow into the 2" drain pipe. I made them long enough to go into the drain 1". Make sure the elbow inside the bucket is pointed down to drain properly. By now you should have everything done except the pump and water lines. Unroll and cut the 1/2" poly to fit the system, allow a little extra to close off the end and make sure it fits the pump correctly. Feed the line through the zipties and bucket drains, when you get to the end just fold about 3" over to close off the pipe and ziptie it with a smaller size or use a piece of wire. Remove the pump from the box, inside should have a few fittings for different sized poly, install the one that fits to the poly. I think I used a lighter to melt the poly a little to get a good connection. Set the pump in the reservoir so it sits flat and the poly isn't kinked. Once your finished fighting the poly to get it to lay flat and neat it's time to punch holes for the 1/4" tubing. Use the hole punch and install the barbed fittings. I found that you need to pinch the poly on the sides to make punching the hole easier, you'll know what I mean when you try the first one. I made the 1/4" lines long enough to wrap around the bucket handles to help hold them there and then cut a 6" piece of 1/2" poly to insert in the perlite. By doing this it allows the top of the perlite to dry out so algae doesn't grow to crazy and it directs the solution to the rootzone. You'll have to push the poly deeper into the bucket then pull it up a little to unclog the poly, you'll know it's right when the water just flows through it and not fill it up and come out the top. Time to fill the buckets, put a paint strainer in and fill it with perlite, it's dusty so be careful. Wet it down slowly and continue to wet it down till the water runs clear from the bucket. Set them in place when you're done. Nutrients: After 2 seasons using the HDX tote I know that if I fill it up to about 1 1/2" from the top that it close to 25 gallons. I mix all my solution inside. Masterblend=72 grams Calcium Nitrate=72 grams Epsom Salt=36 grams You have to mix each individually or they won't dissolve properly, I use an old mayo jar filled about half with hot water, mix and shake till dissolved then pour into a larger container. I do this for all 3 then just dump it in the reservoir already filled to 1 1/2" from the top. Plug in the pump and let it run for a few hours to flush out the fresh water and mix the solution up. I have the pump plugged into the timer, the timer is set to run 15 minutes 3 times a day for established plants. I've found that when you put new plants in that they grow better running the pump 24/7 for about a week. This lets the plant grow new roots and get accustomed to hydro growing. What plants to use=ANY... You can grow any plant from anywhere in this system. I bought Big Beef Hybrid last year and they grew fine. Plants are tougher than we think so just wash them off and set them in and watch it grow. I take a bucket of water and clean all the soil off the roots under water, it works well. Now that you have everything, the extras come in handy. I can grow just about anything in a bucket with just perlite and the solution, tomato suckers will grow fast and still set flowers. When I 1st put the system together I was always worried about doing something wrong and being extra careful about not allowing anything in the system. Well you can be careless and still grow well, I've had 1 of the water lines fall out and empty the reservoir many times and once you fill it back up the plants take off. That little pump has ran dry for weeks when I thought I turned it off and it still works fine. |
|
|

|
|
|
#2 |
|
Tomatovillian™
Join Date: Sep 2010
Location: Sacramento CA
Posts: 288
|
Excellent tutorial!
Rick |
|
|

|
|
|
#3 |
|
Tomatovillian™
Join Date: Mar 2016
Location: NC
Posts: 511
|
Very much excellent. I have been going back and forth on whether or not to go to a dutch bucket system. I currently use Kratky.
On a side note, I have the exact same Harbor Freight pump in my front yard in a pond. It has run 24/7 since last year. It ran the entire winter, ice water and all (whoops) That pump is still plowing along. |
|
|

|
|
|
#4 |
|
Tomatovillian™
Join Date: Jan 2015
Location: AL
Posts: 1,993
|
Thanks for breaking it all down. I agree! A great tutorial. : ) Maybe later in the season, I'll give trying to build one a try. Now I know what a Dutch Bucket is. Thanks!
|
|
|

|
|
|
#5 |
|
Tomatovillian™
Join Date: Mar 2014
Location: Mid-Atlantic right on the line of Zone 7a and 7b
Posts: 1,369
|
Excellent detail and great tutorial.
Details and costs are important. My kinda grower. Best instructional I've seen here. |
|
|

|
|
|
#6 |
|
Tomatovillian™
Join Date: Jan 2013
Location: Ardmore,Oklahoma
Posts: 172
|
Thank you for taking the time to post.
Rick |
|
|

|
|
|
#7 |
|
Tomatovillian™
Join Date: May 2012
Location: SW Ohio
Posts: 637
|
Is your nutrient blend all organic by the group of people who certify organic growers?
Zeroma |
|
|

|
|
|
#8 |
|
Tomatovillian™
Join Date: Jan 2014
Location: Tomato Cornhole
Posts: 2,550
|
|
|
|

|
|
|
#9 |
|
Tomatovillian™
Join Date: May 2012
Location: SW Ohio
Posts: 637
|
Your set up and tutorial is just fabulous. I want to get up to speed on hydroponics/Dutch Buckets or self-watering and all the kinds of growing options other than traditional in the soil. I'll take some time and really read this. Again, thanks for putting some time and effort into this tutorial.
If I can find more nutrient information, I'm just guessing there is no reason why I couldn't go totally organic? I just haven't looked into it. Zeroma |
|
|

|
|
|
#10 |
|
Tomatovillian™
Join Date: Jan 2014
Location: Tomato Cornhole
Posts: 2,550
|
I don't think you can go organic without it being a smelly mess but I might be wrong. You need to watch a few videos from MHPGardener about dutch buckets, he's the man that made it so popular and he also has a rail system and uses the Kratky method for greens. https://www.youtube.com/watch?v=1o9LiRIRSgI
Last edited by Rajun Gardener; October 7, 2016 at 11:06 AM. |
|
|

|
|
|
#11 |
|
Tomatovillian™
Join Date: May 2012
Location: massachusetts
Posts: 1,710
|
Lookin good Rajun.
Gotta love hydro. |
|
|

|
|
|
#12 |
|
Tomatovillian™
Join Date: Jun 2007
Location: kentucky
Posts: 1,019
|
Disease or other problems?
|
|
|

|
|
|
#13 |
|
Tomatovillian™
Join Date: Jan 2014
Location: Tomato Cornhole
Posts: 2,550
|
I haven't had any diseases and only a few worms eating leaves but they're easy to control being inside a greenhouse. Even without a greenhouse I think the pest will be minimal due to the plants being off the ground.
|
|
|

|
|
|
#14 |
|
Tomatovillian™
Join Date: Oct 2016
Location: Texas
Posts: 35
|
I have tried this setup once indoors and the first two weeks growth was great but then the next 2.5 weeks nothing and they started to die. I had it setup very similar to yours and used MPH and mean shoes on youtube to get my information. After I pulled the buckets I looked at the roots and they had root rot. They only think I can take away from why is that I was running my feeding timer for 15 on 15 off as that is how they were doing it. From what you say to only run it 3 times a day sounds more realistic. Anyways I decided to give coco a shot but kept all my gear and will be trying the Dutch system again in the near future. Thanks for you info gave me some new ideas
__________________
From my youtube friend/idol "above all else be good to each other". Honestly a little kindness goes along way 
|
|
|

|
|
|
#15 |
|
Tomatovillian™
Join Date: Jan 2014
Location: Tomato Cornhole
Posts: 2,550
|
I do run the pump 24/7 for the 1st week then cut back to 3 times a day. How deep did you put the plants in? I don't put them deep enough to sit in the bottom where it holds water. I plant so the roots are about 2" above the water line in the bucket, this makes the plant send out roots that will eventually sit in the water.
Do you have pics of how you had it set up? |
|
|

|
 |
|
|
